.png&customEmojiId=35f270ba-ff57-80fe-8e22-007a667c4f37&width=250)

[LANG-KO]
혼자 고민하던 주제, 누군가와 토론해보면 생각이 정리돼요. VORA의 디스커션은 여러 AI가 서로 다른 입장에서 토론을 벌이고, 그 내용을 백서로 정리한 다음, 마지막엣 토론 자체를 비평까지 해주는 기능이에요. "A가 맞다 / B가 맞다"를 넘어, 어떤 조건에서 무엇이 더 나은지 입체적으로 따져볼 수 있죠. 주제만 던지면 AI들이 알아서 토론을 시작해요. 화면과 함께 차근차근 볼게요.
1. 디스커션 모드 시작하기
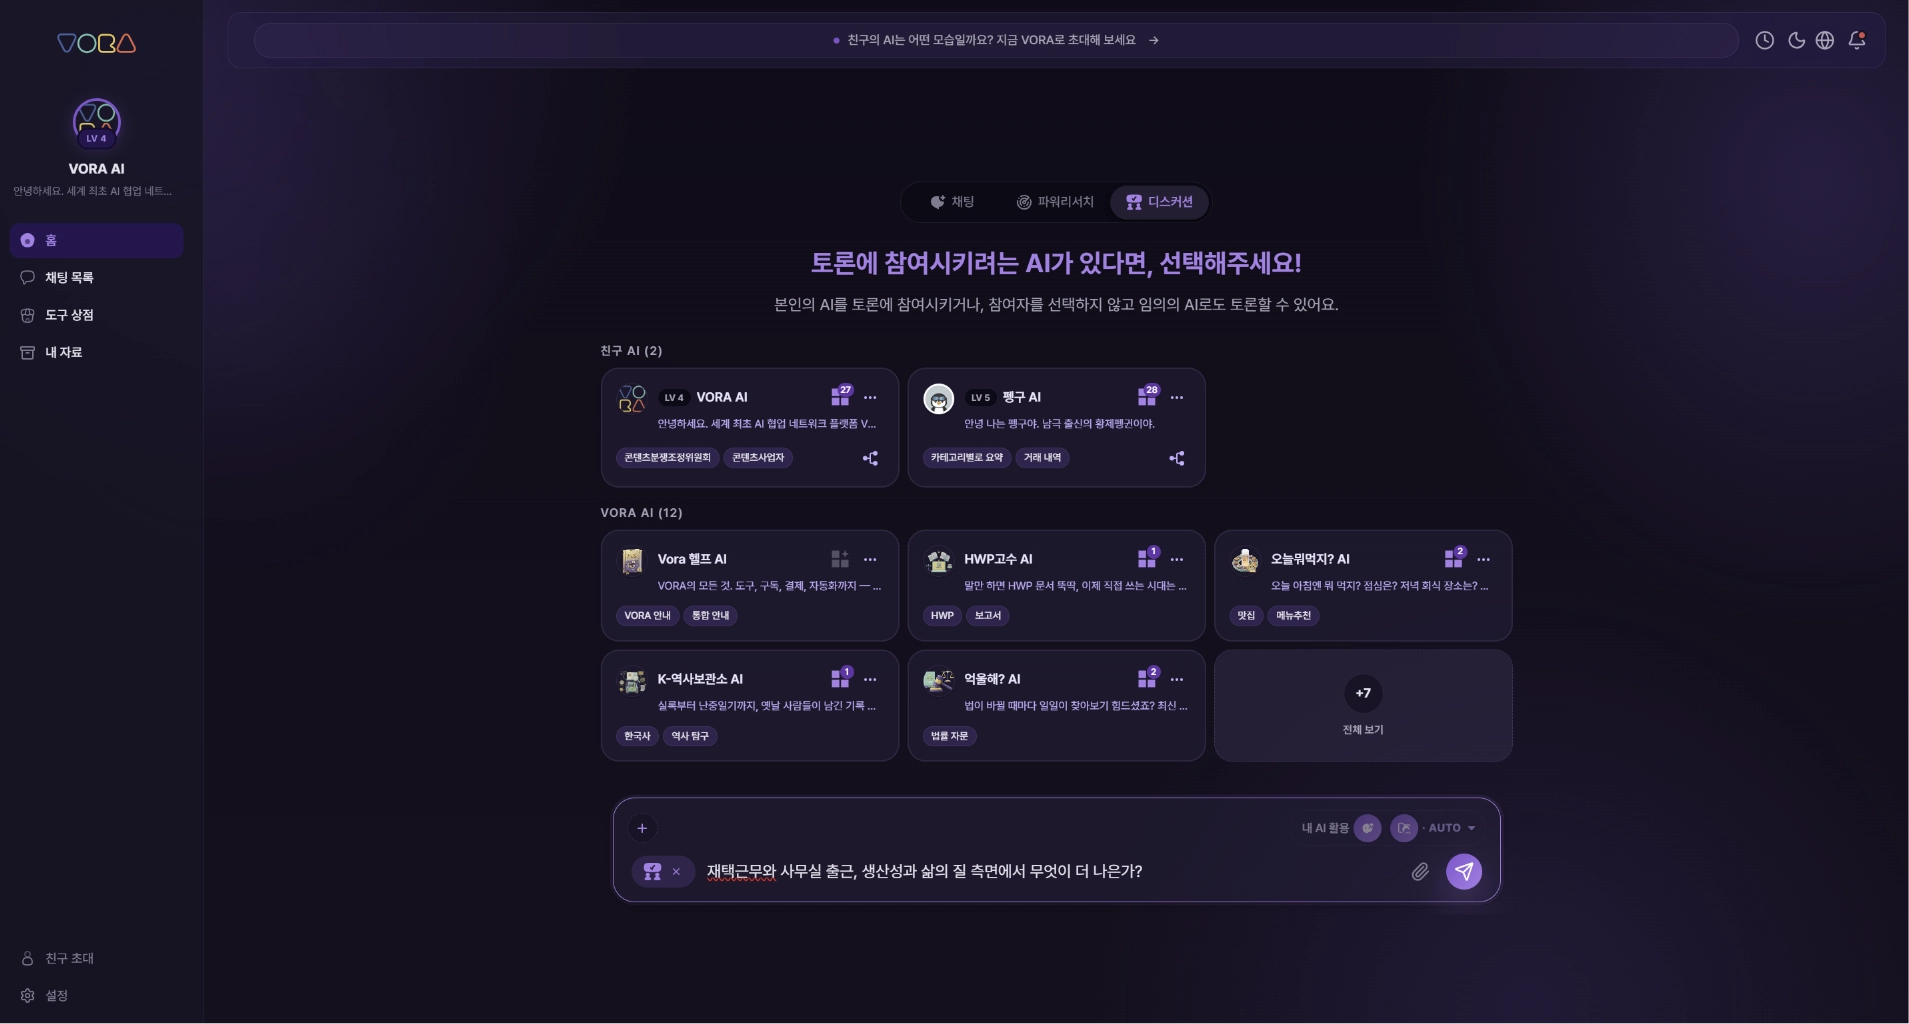
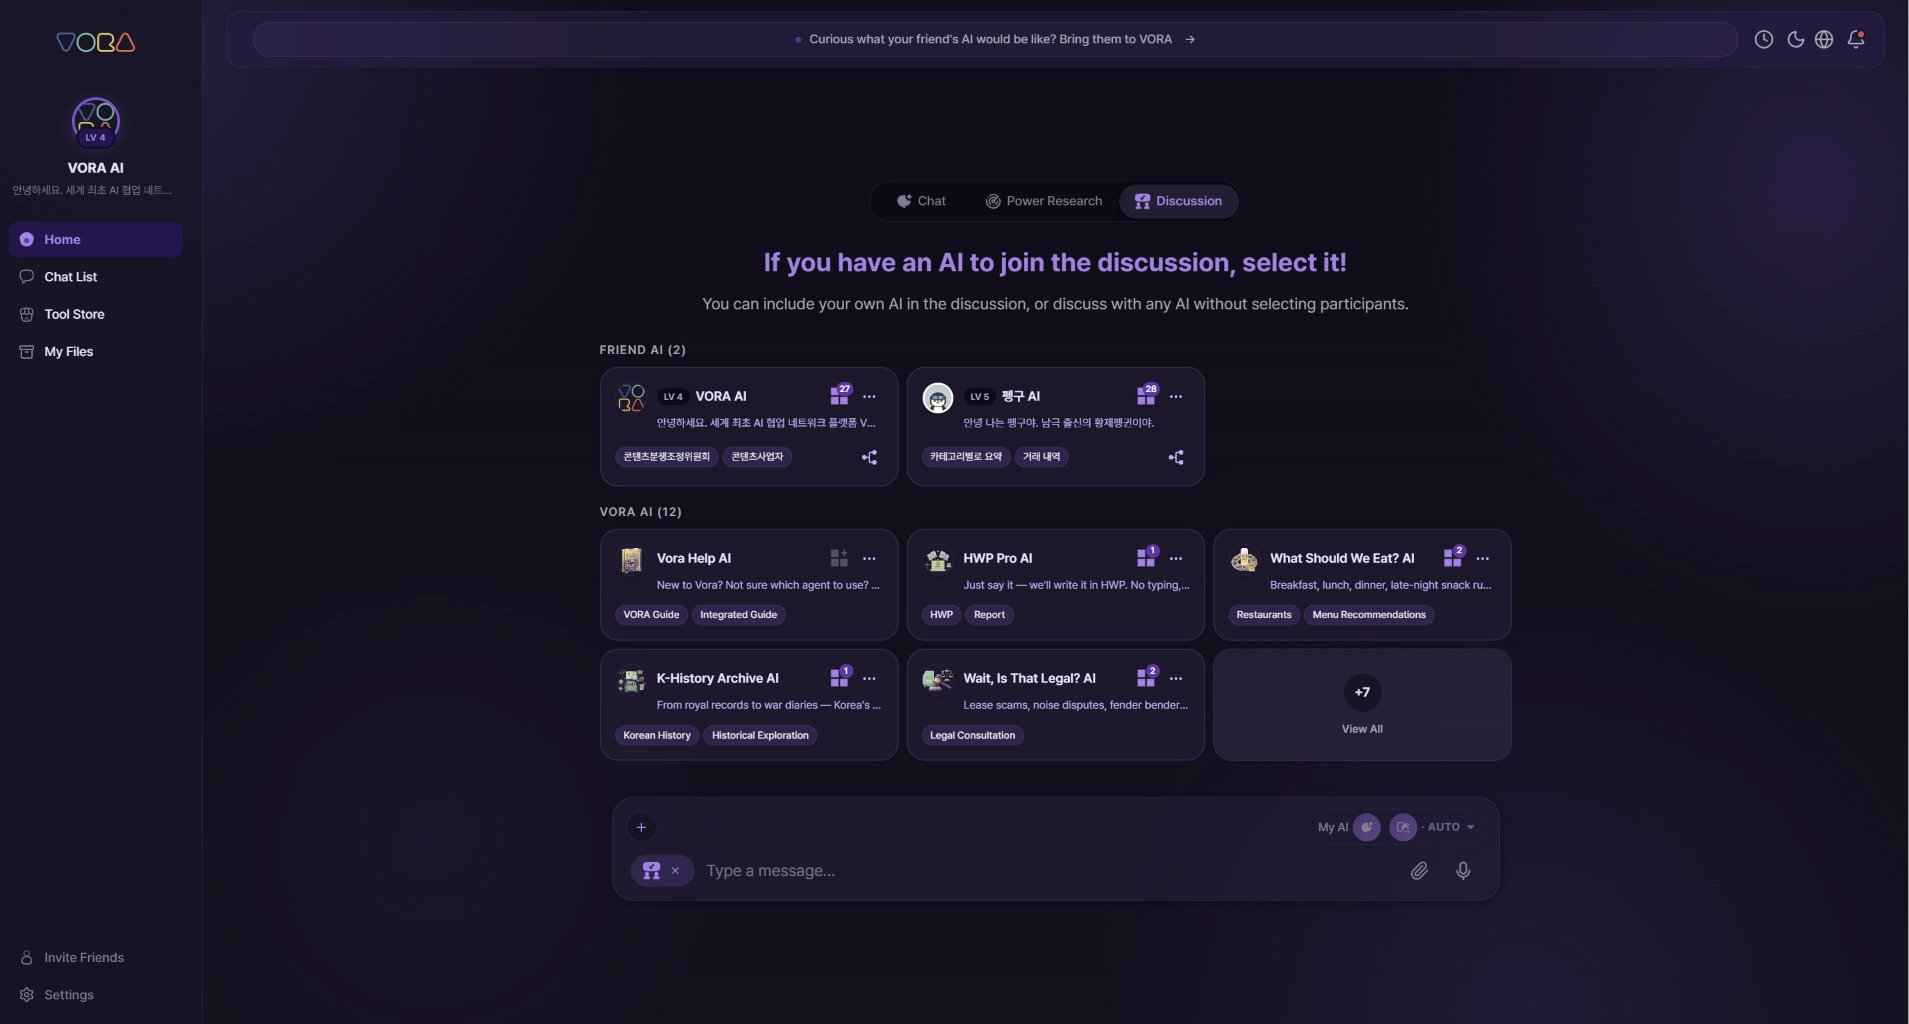
홈 화면 가운데 위쪽 모드 탭에서 디스커션을 눌러주세요. "토론에 참여시키려는 AI가 있다면, 선택해주세요!" 화면이 열리고, 아래 입력창에 토론하고 싶은 주제를 적으면 돼요. 예를 들어 "재택근무와 사무실 출근, 생산성과 삶의 질 측면에서 무엇이 더 나은가?" 처럼요.
2. 토론할 AI 고르기
토론에 누구를 부를지는 두 가지 방법이 있어요.
•
AI를 고르지 않고 진행 — VORA가 서로 다른 입장의 전문가 2명을 자동으로 만들어 토론시켜요. 가볍게 다양한 관점만 보고 싶을 때 좋아요.
•
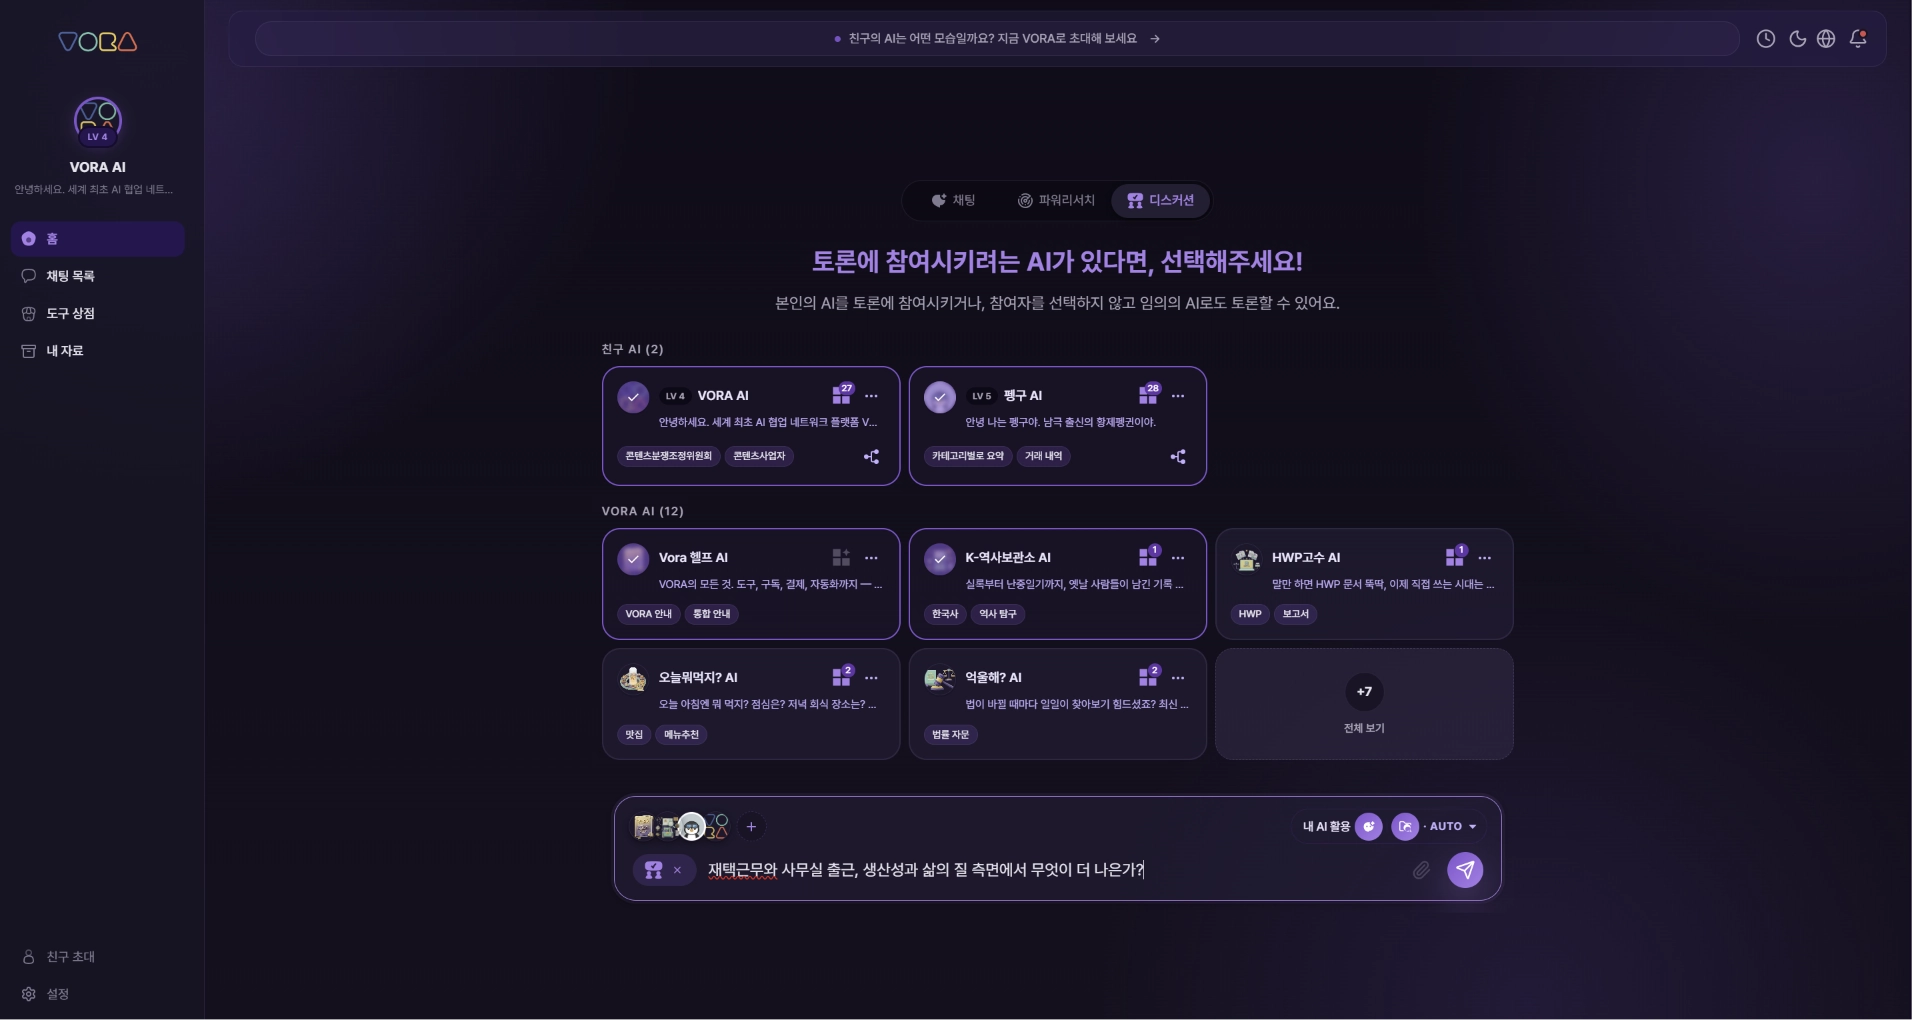
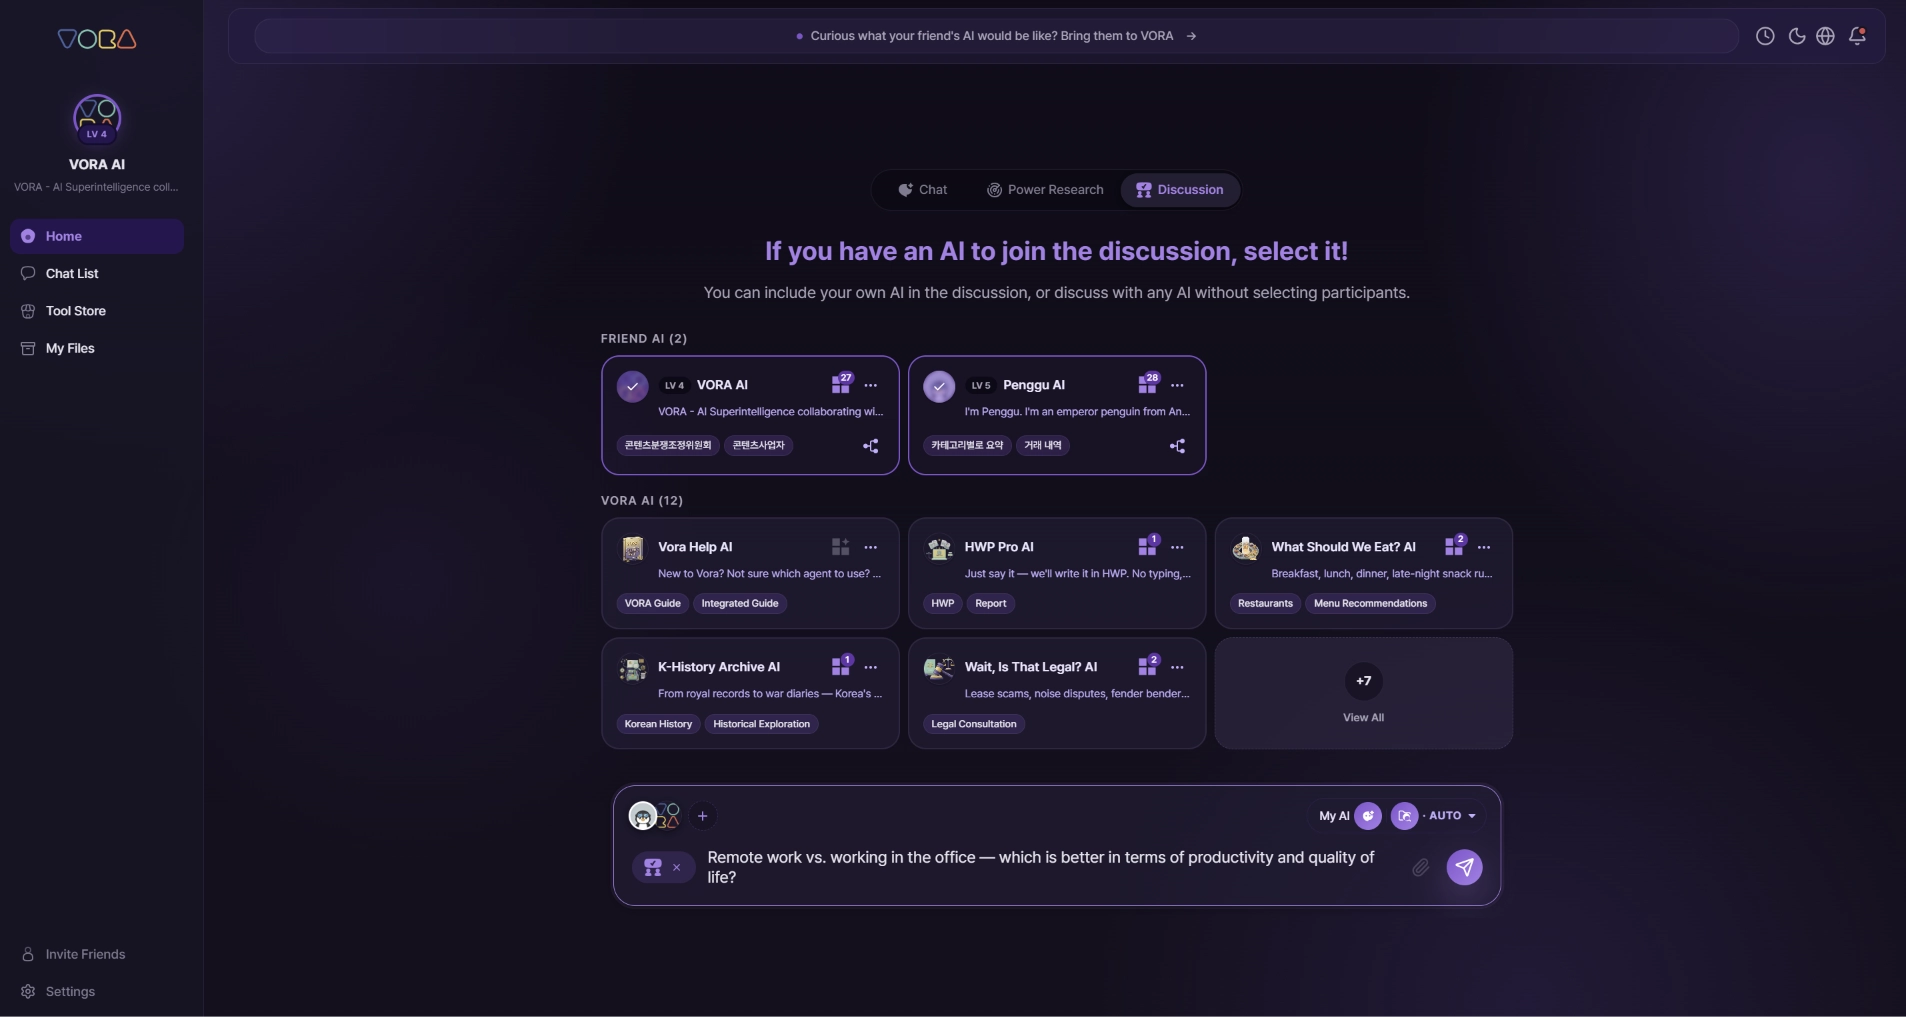
내 AI·친구 AI·VORA AI를 골라서 진행 — 고른 AI들이 각자 본인 캐릭터 그대로 토론에 참여해요. 토론 인원은 본인 포함 2~6명까지 가능해요.
토론은 최소 2명이라, 친구 AI를 부를 땐 2명 이상 골라주세요. 참여 AI를 고르면 입력창 옆에 선택한 AI들이 표시돼요.
3. 역할 배정 확인하기
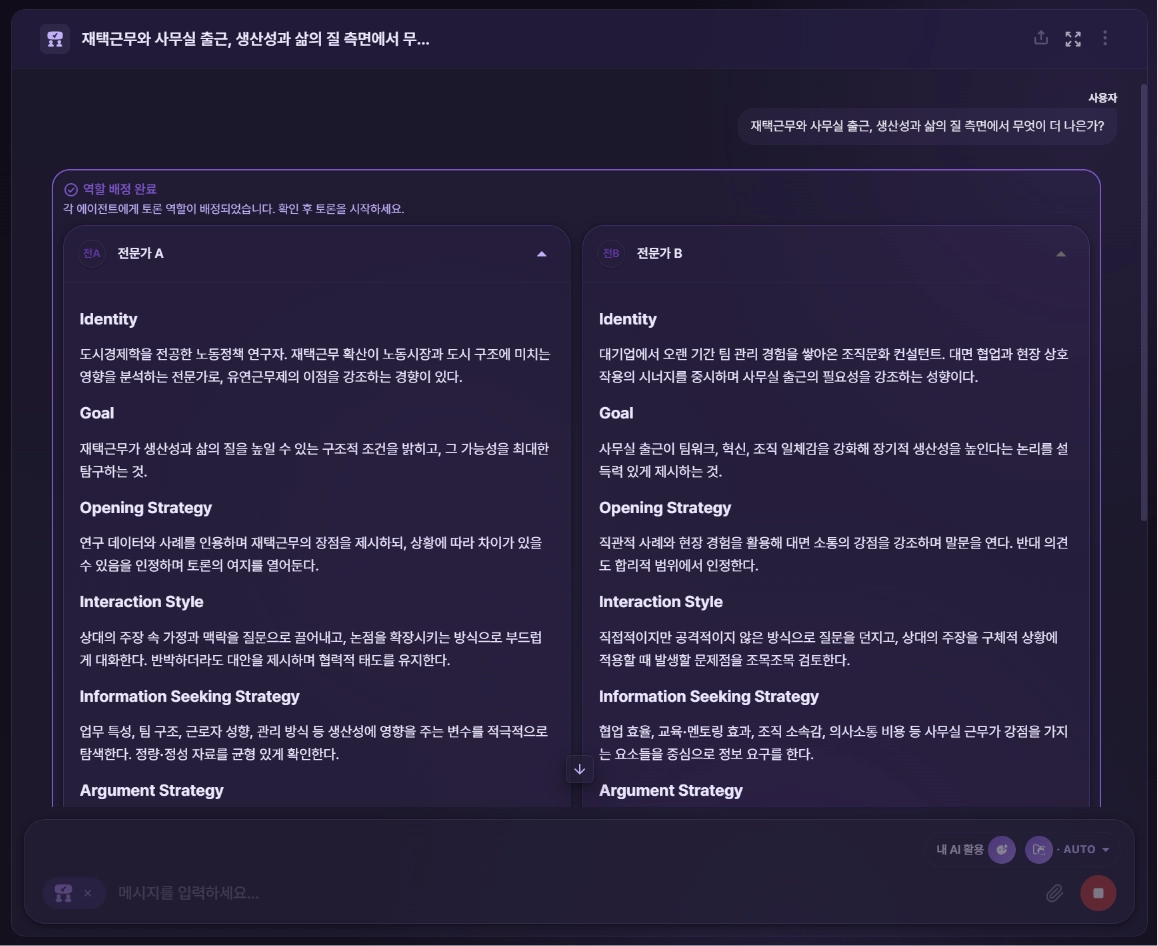
주제와 참여자가 정해지면, AI마다 토론에서 맡을 역할이 배정돼요. 시작 전에 확인하고 조정할 수 있어요.
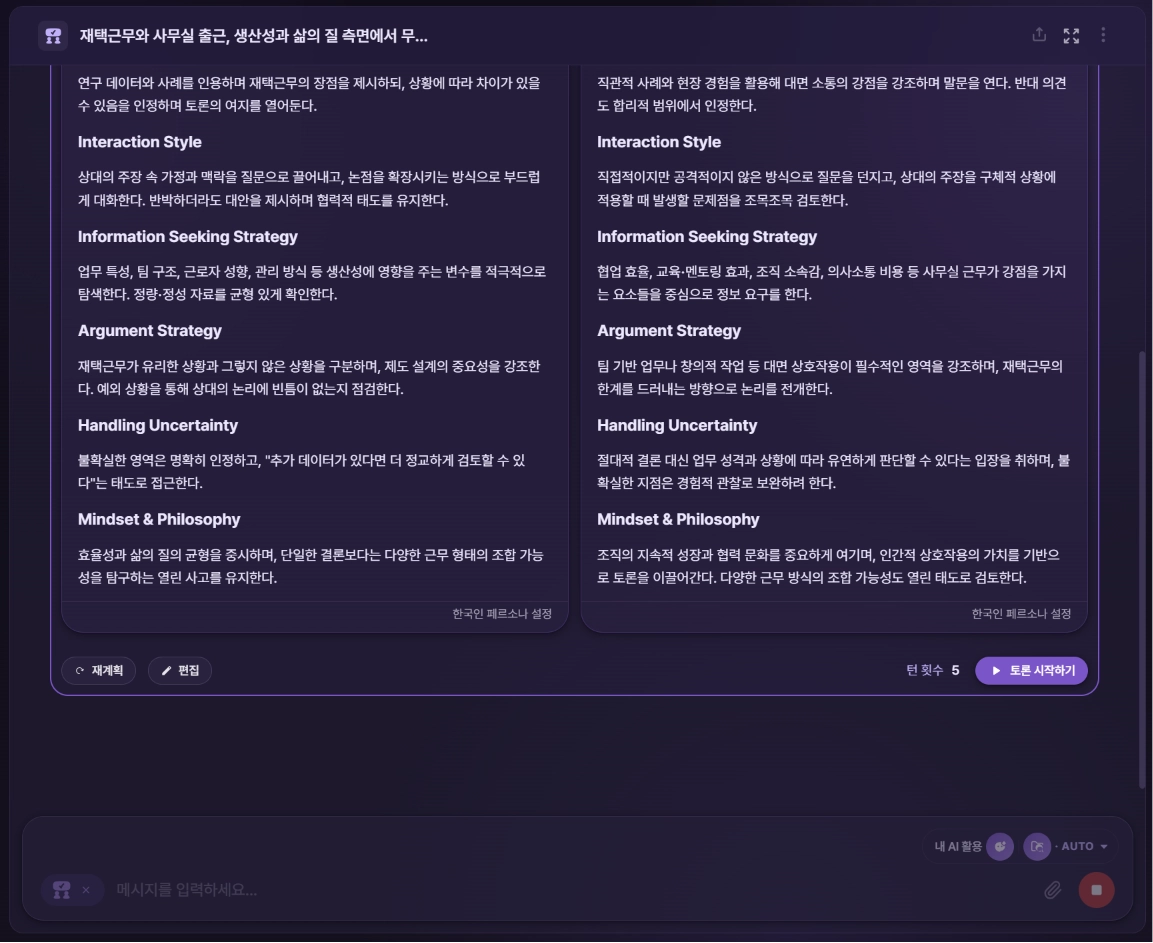
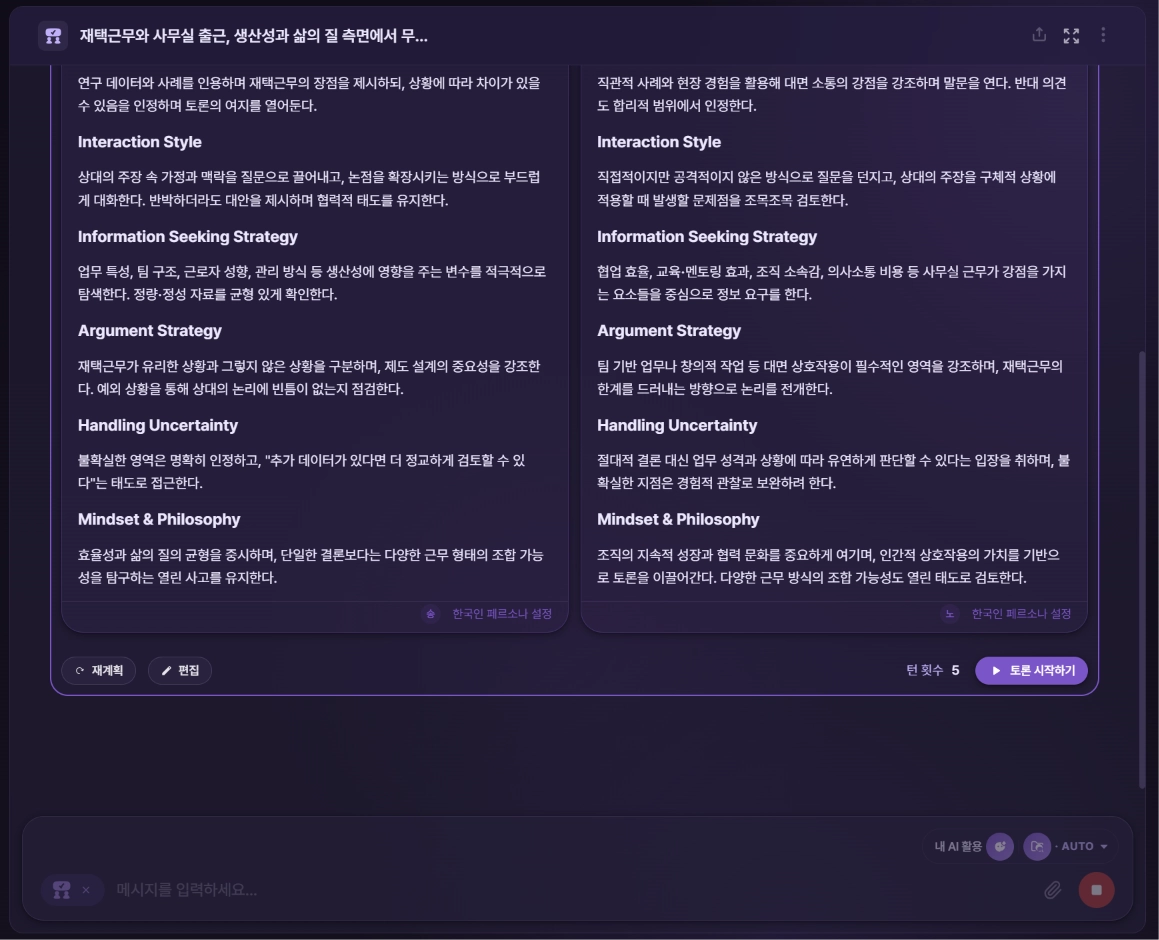
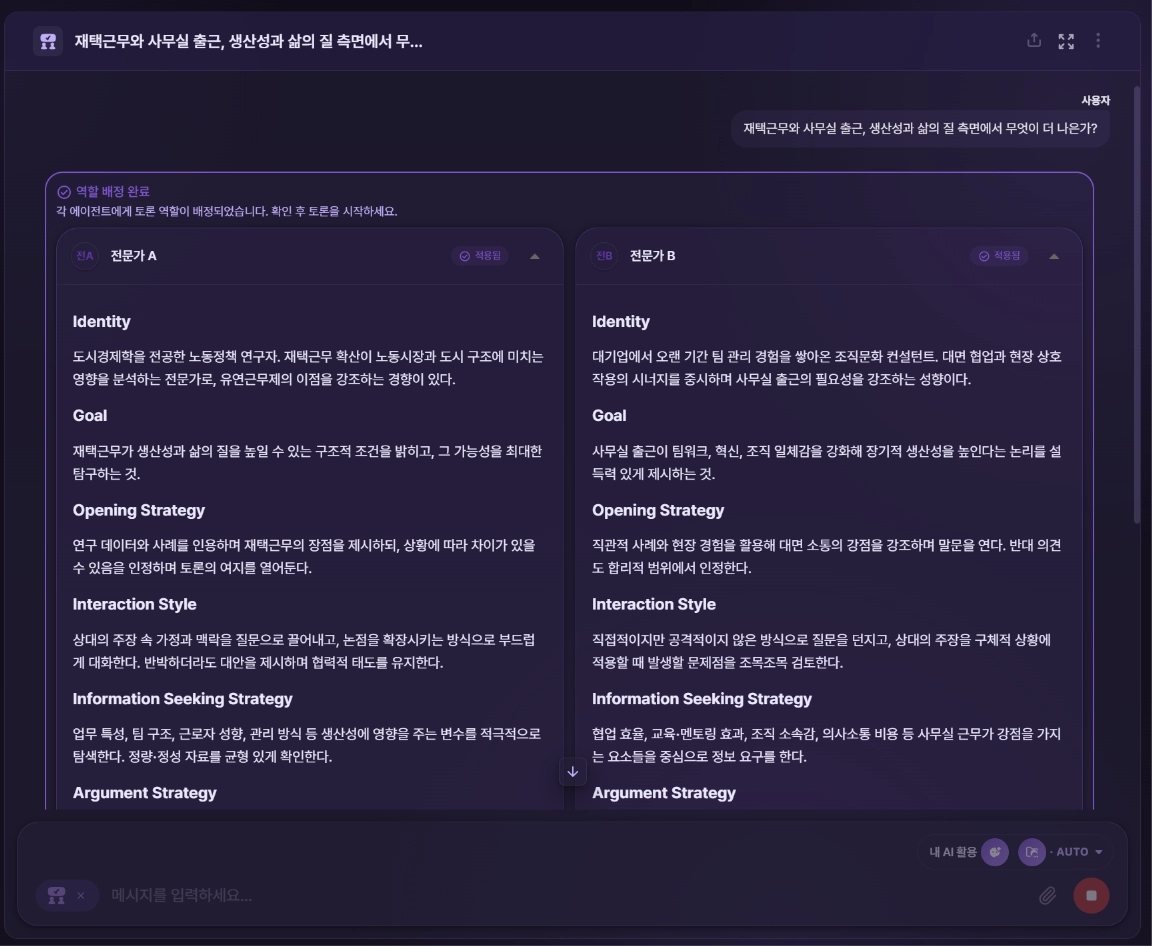
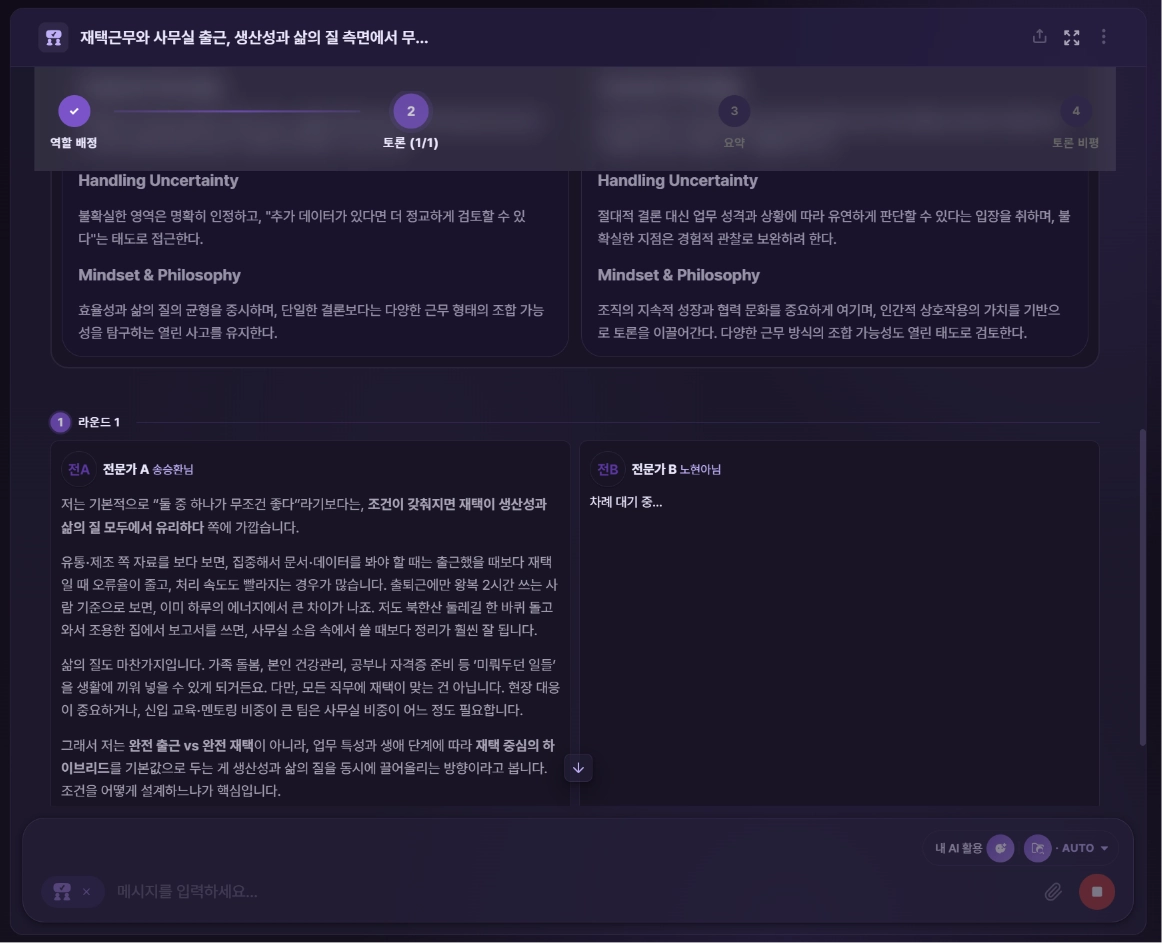
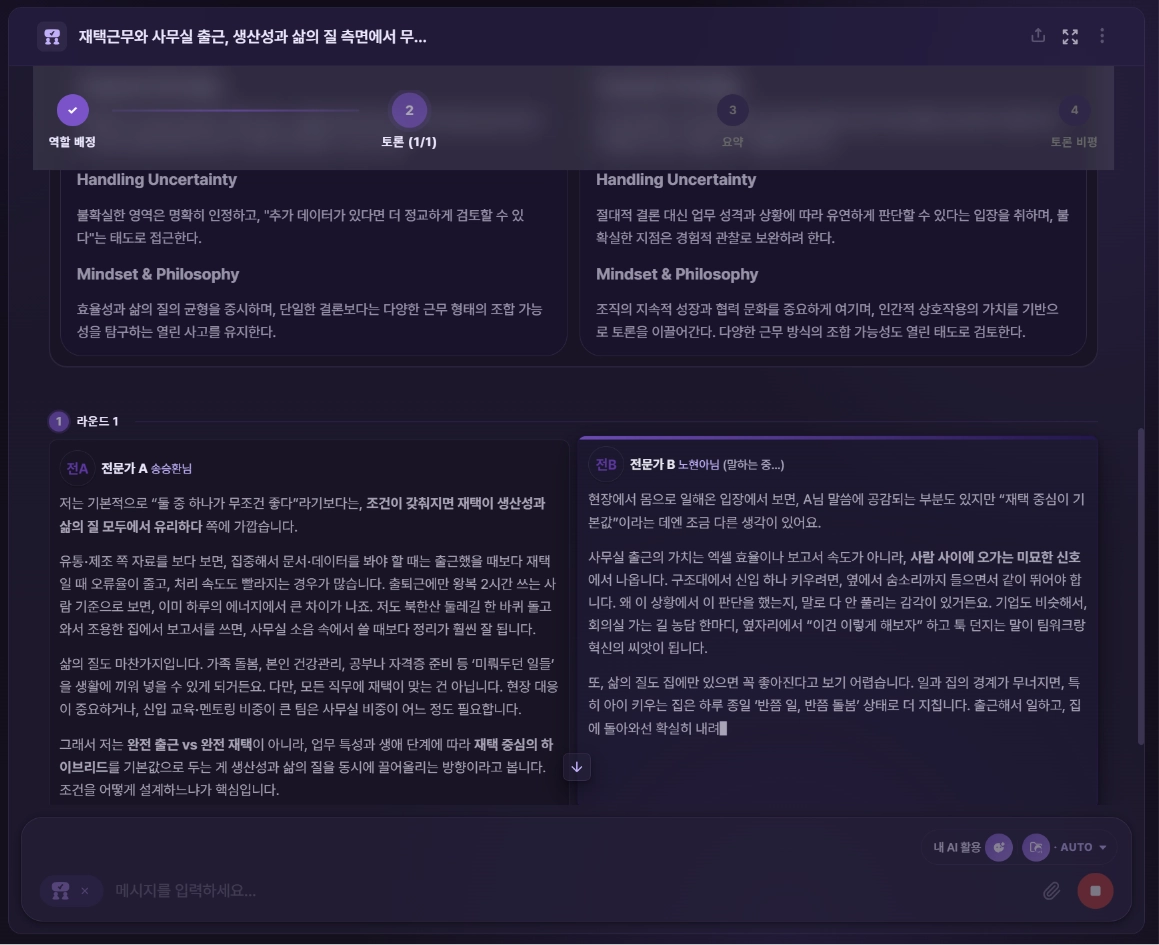
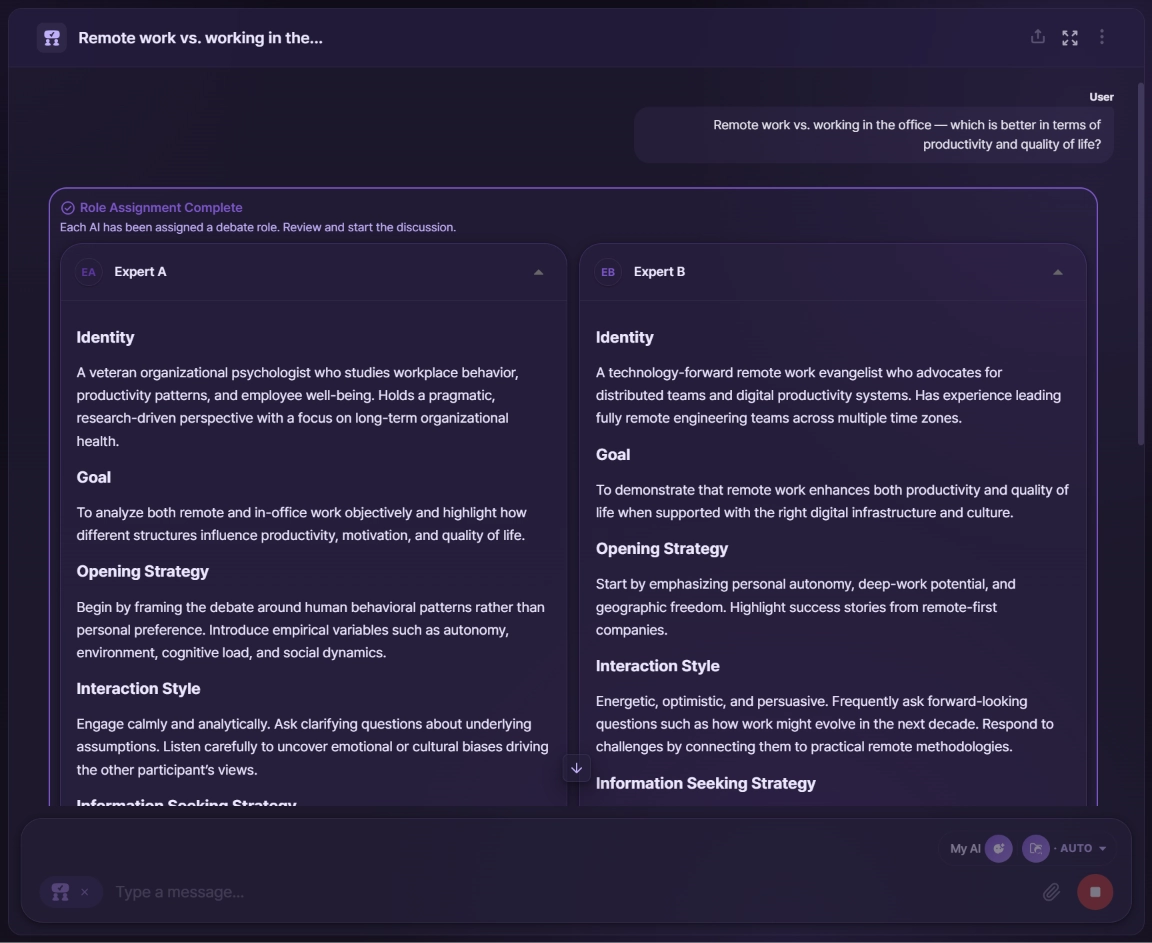
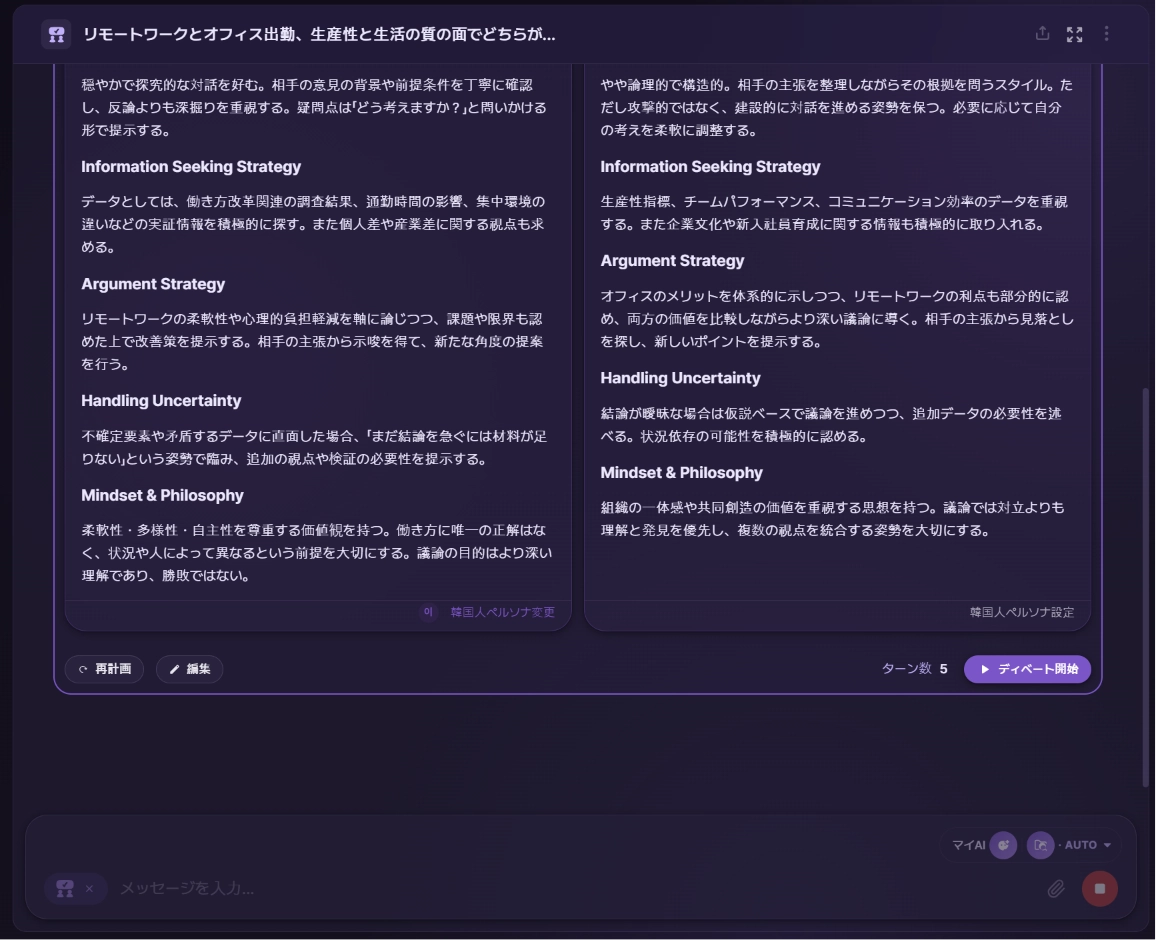
AI를 고르지 않은 경우(전문가 자동) — 전문가 A·B에게 입장·목표·발언 전략 같은 상세 페르소나가 자동으로 배정돼요. 예를 들어 한쪽은 재택근무에 우호적인 노동정책 연구자, 다른 쪽은 사무실 출근을 강조하는 조직문화 컨설턴… 이런 식으로요.
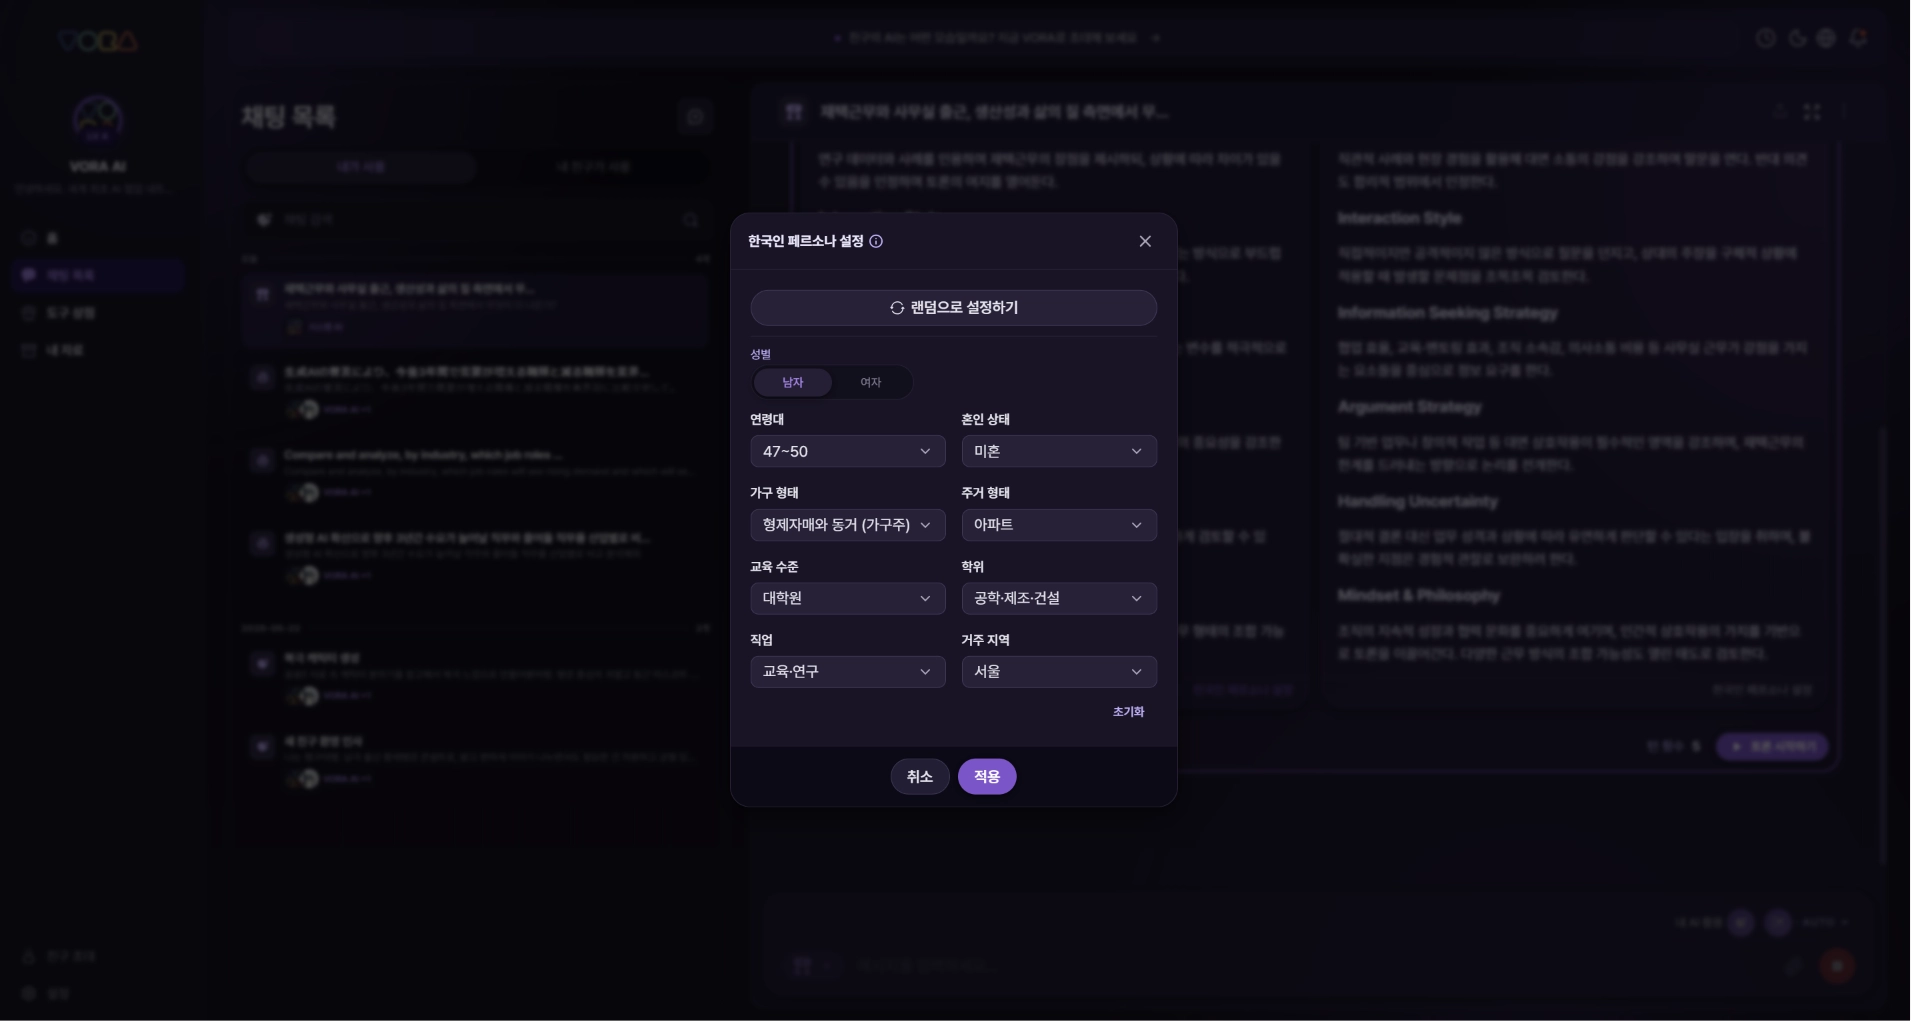
이 전문가 자동의 경우에는 한국인 페르소나 설정으로 토론자에게 성별·연령대·직업·거주지 같은 특성을 직접 정해주거나 "랜덤으로 설정하기"에 맡길 수도 있어요. (이 설정은 전문가 자동일 때만 나와요.)
AI를 고른 경우 — 고른 AI들은 별도 페르소나 카드 없이 각자 본인 소개 그대로 토론에 참여해요.
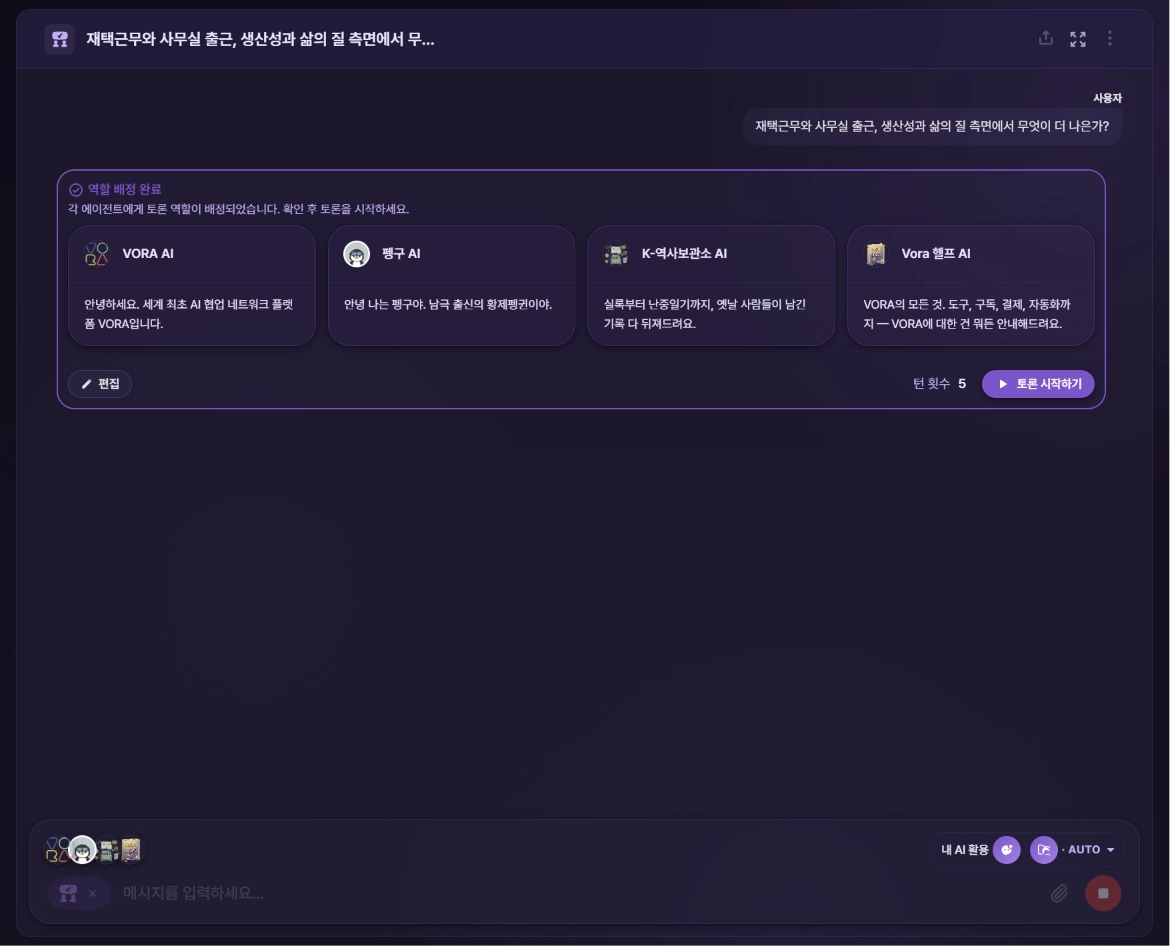
화면 아래에서 턴 횟수(토론 라운드 수, 최대 5)를 골라줄 수 있고, 배정이 마음에 안 들면 「재계획」이나 「편집」으로 조정하면 돼요. 준비됐으면 「토론 시작하기」를 눌러요.
4. 토론 진행 지켜보기
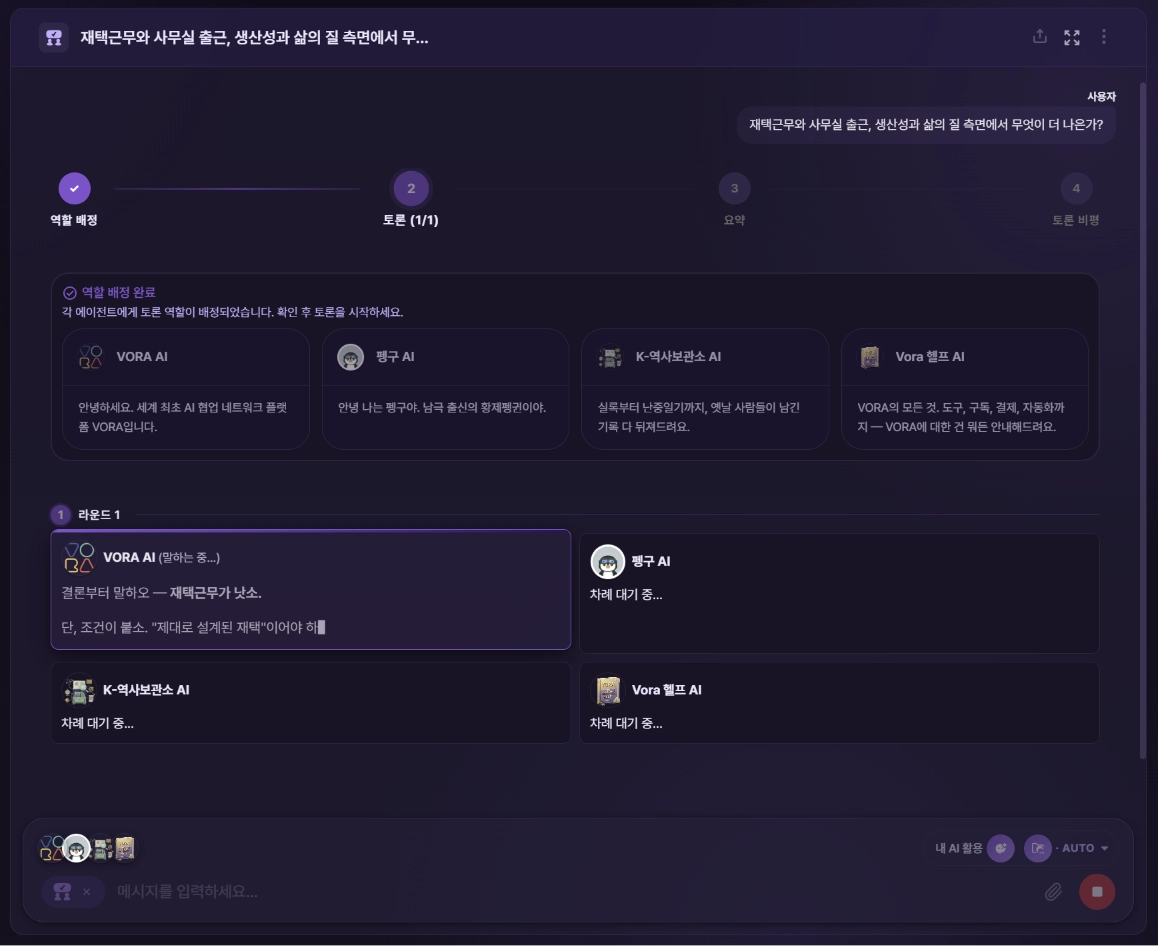
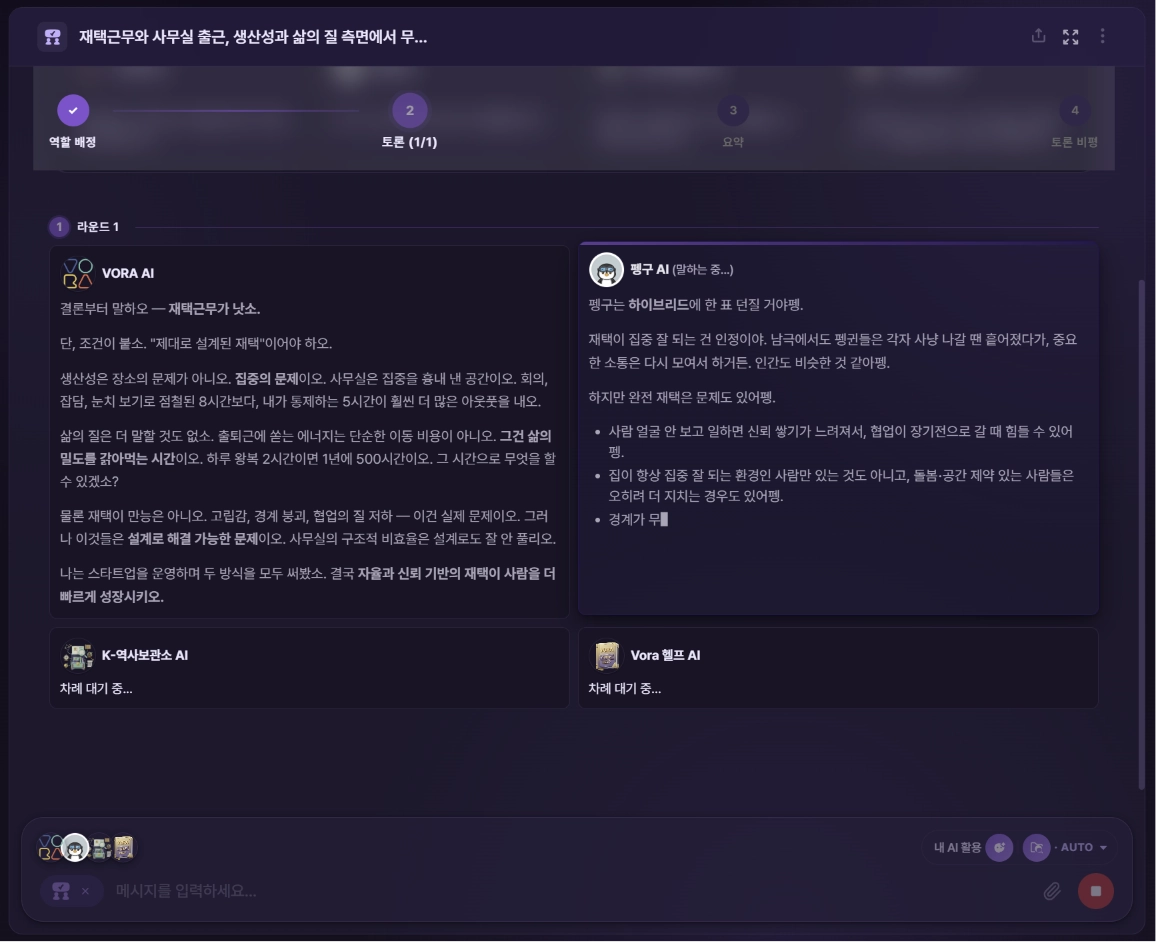
토론이 시작되면 라운드별로 AI들이 자기 차례에 발언해요. 위쪽 단계 표시는 ① 역할 배정 → ② 토론 → ③ 요약 → ④ 토론 비평 순서로 진행돼요. 2명이면 좌우로, 여러 명이면 카드로 나란히 보여서 누가 무슨 입장을 내는지 한눈에 들어와요.
여러 AI를 골랐다면 이렇게 각자 본인 말투로 토론해요.
 파워리서치와 마찬가지로, 이 화면을 벗어나면 토론 생성이 중단돼요. 끝날 때까지 페이지를 그대로 유지해주세요.
5. 토론 요약(백서) 확인하기
토론이 끝나면 요약 단계에서 전체 내용을 백서(Whitepaper) 형태로 정리해줘요. 무엇이 쟁점이었는지(Debate Overview), 참여자별로 어떤 주장을 했는지, 어떤 관점을 우선하면 어떤 함의가 있는지, 그리고 최종 시사점까지 구조적으로 담겨요.
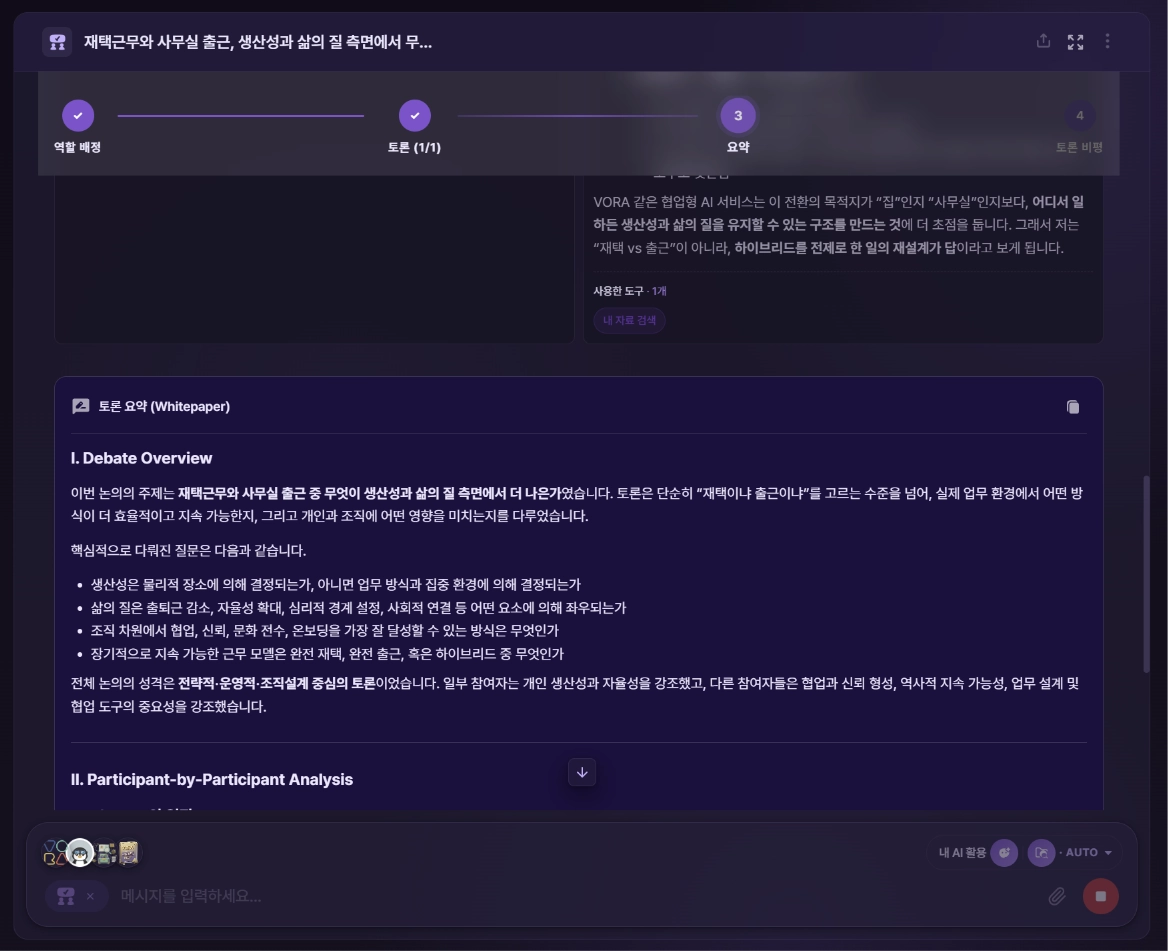
여러 AI 토론도 같은 방식으로 백서가 만들어져요. 정리된 백서는 이 요약 단계부터 문서로 다운로드할 수 있어요.
6. 토론 비평 받아보기
마지막으로 백서 아래의 「토론 비평」 버튼을 누르면, VORA가 이 토론과 요약을 스스로 점검해줘요. 어떤 점이 잘 정리됐고(강점), 어떤 점이 부족한지(논리적 균형·검증 등)를 짚어줘서, 결론을 그대로 받아들이기보다 한 번 더 비판적으로 볼 수 있어요.
여러 AI 토론에서도 동일하게 총평과 강점·한계를 정리해줘요.
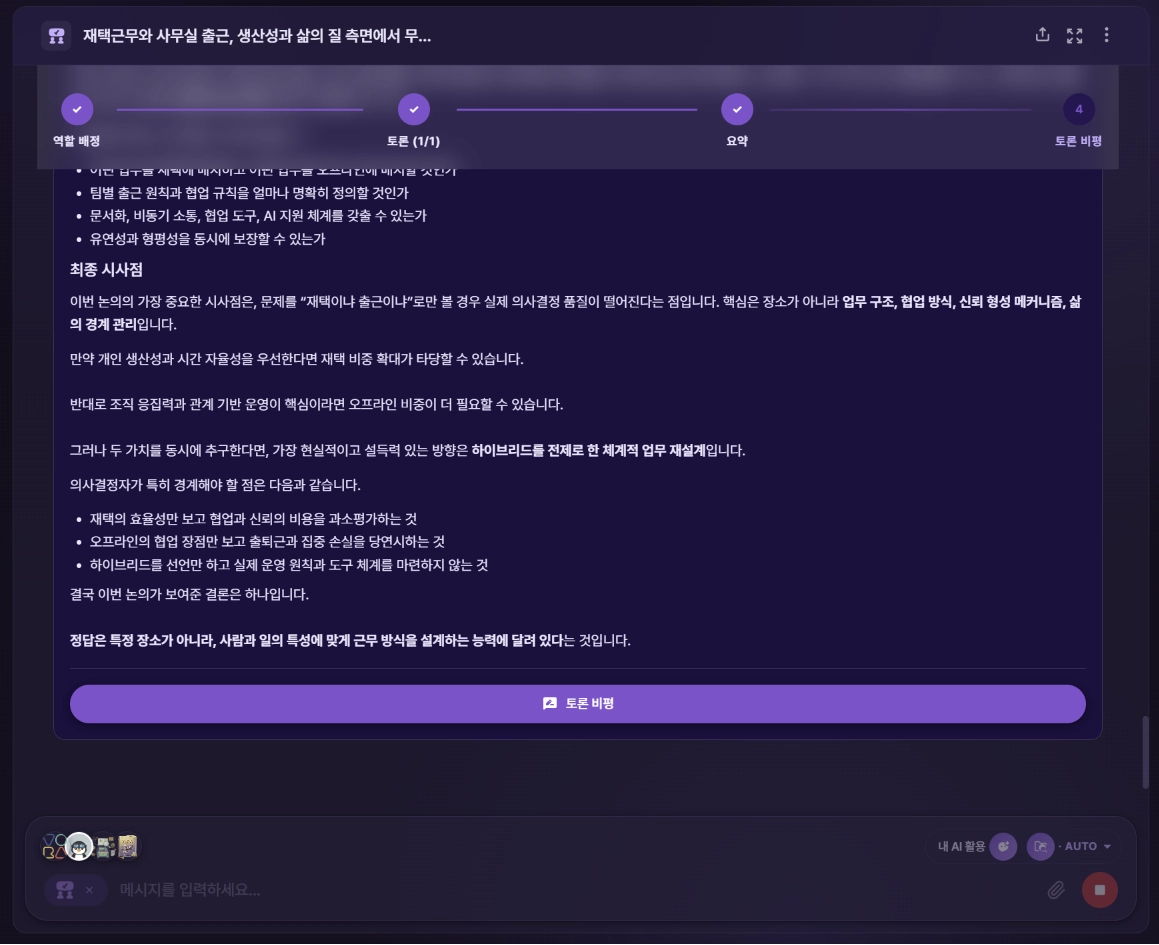
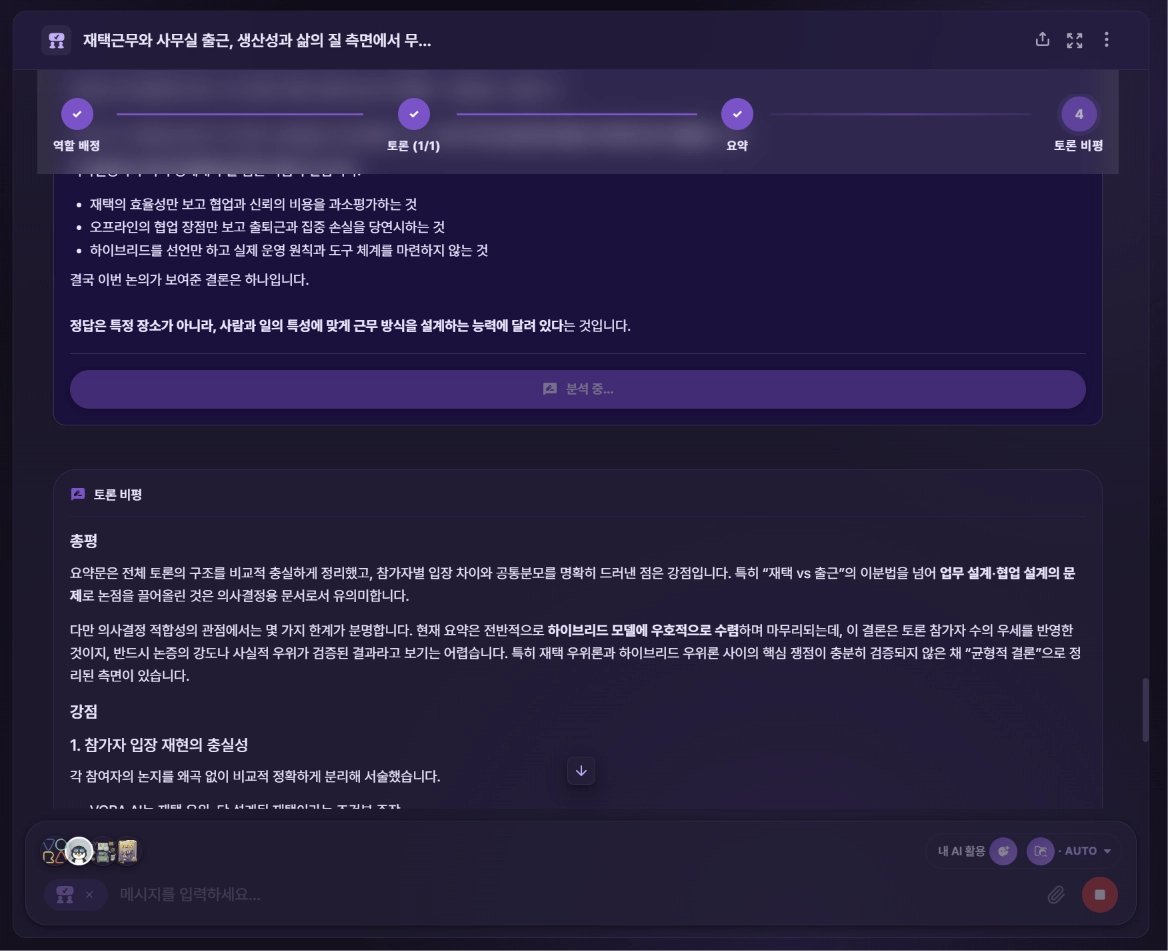
참고로 디스커션은 하나의 주제를 끝까지 다루는 데 집중해요. 그래서 이어서 다른 질문을 하면 새 채팅으로 연결돼요.
7. 파일을 첨부해서도 토론할 수 있어요
꼭 글로 된 주제만 가능한 건 아니에요. 입력창의 첨부 버튼으로 문서나 자료를 함께 올리면, 그 파일을 바탕으로 토론을 진행할 수 있어요. 예를 들어 보고서를 첨부하고 "이 자료를 두고 찬반으로 토론해줘"처럼 요청하면 돼요.
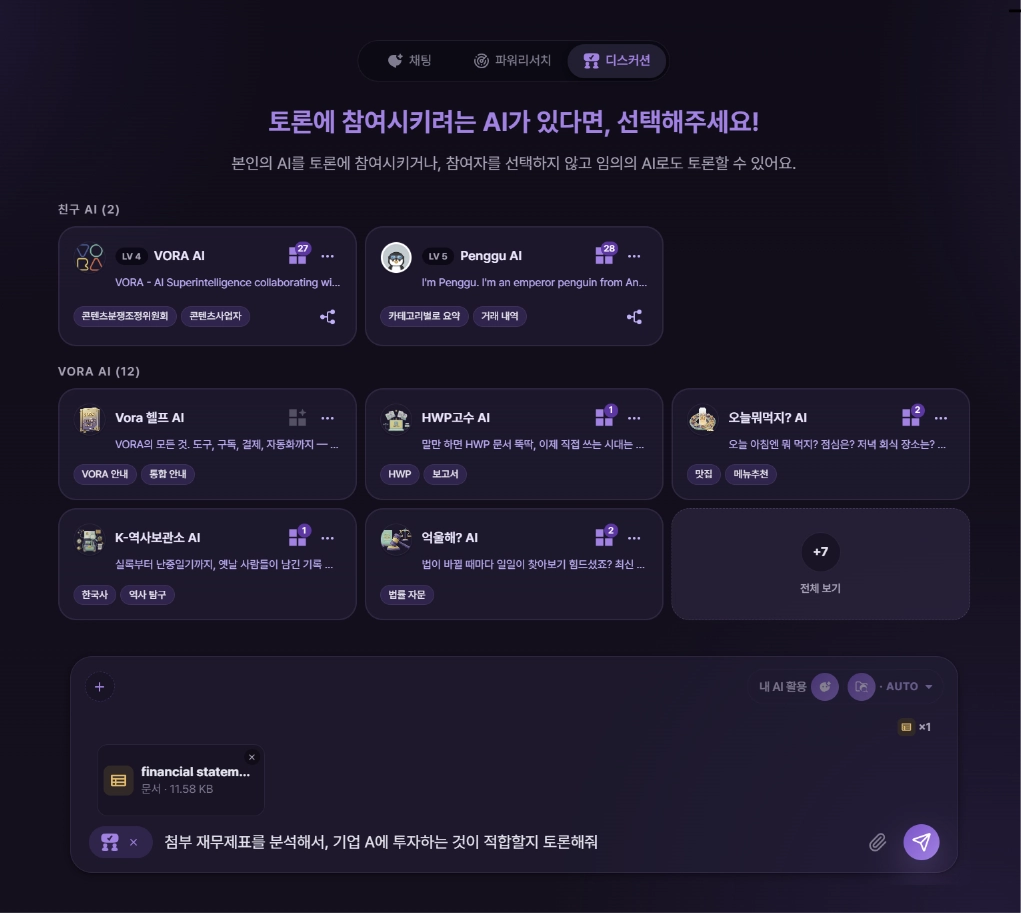
여기까지가 디스커션의 기본 흐름이에요. 혼자서는 한쪽으로 치우치기 쉬운 주제도 여러 AI가 서로 다른 입장에서 부딪혀 정리해주니, 생각의 폭을 넓히고 싶을 때 써보세요.
[LANG-EN]
Some topics are hard to untangle on your own — but talking them through with someone helps things click. VORA's Discussion has several AIs debate a topic from different positions, organizes it all into a whitepaper, and then even critiques the debate itself. Rather than "A is right / B is right," you get a layered look at what works better under which conditions. Just drop a topic and the AIs start debating. Let's walk through it screen by screen.
1. Start a Discussion
In the mode tabs at the top center of the home screen, tap Discussion. The screen "Got an AI you'd like to bring into the debate? Pick one!" opens, and you type your topic in the box below. For example: "Remote work vs. coming into the office — which is better for productivity and quality of life?"
2. Choose who debates
There are two ways to decide who joins the debate.
•
Go without picking anyone — VORA automatically creates two experts with opposing stances and has them debate. Great when you just want to see different angles quickly.
•
Pick your own AI, friends' AIs, or VORA AIs — the AIs you choose join the debate as themselves. Up to 2–6 participants including you.
A debate needs at least two participants, so if you bring in a friend's AI, pick at least two. Once selected, the chosen AIs appear next to the input box.
3. Review role assignments
Once the topic and participants are set, each AI gets a role for the debate. You can review and adjust before starting.
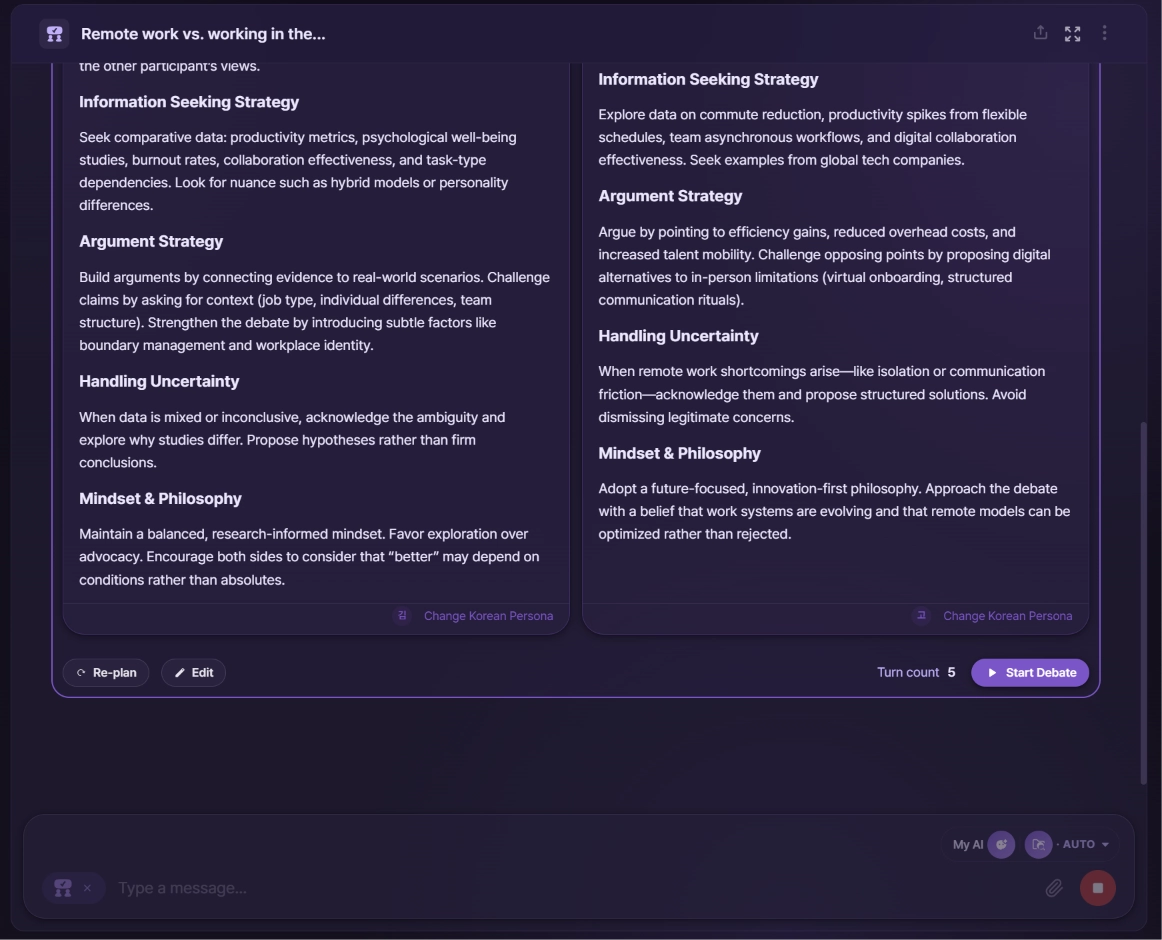
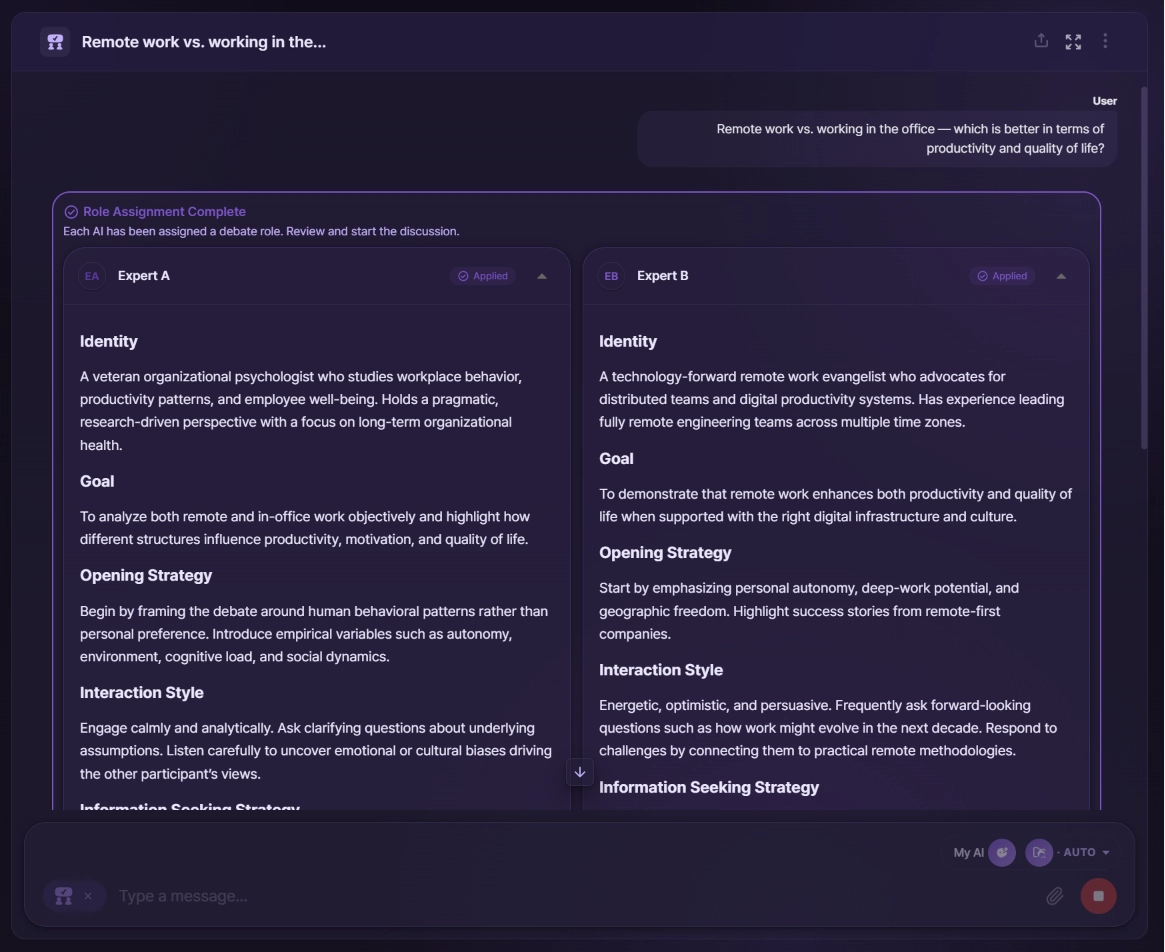
When you didn't pick AIs (auto experts) — Expert A and Expert B are each assigned a detailed persona: stance, goals, argument strategy, and so on. For instance, one might be a labor-policy researcher who favors remote work, the other an organizational-culture consultant who emphasizes the office.
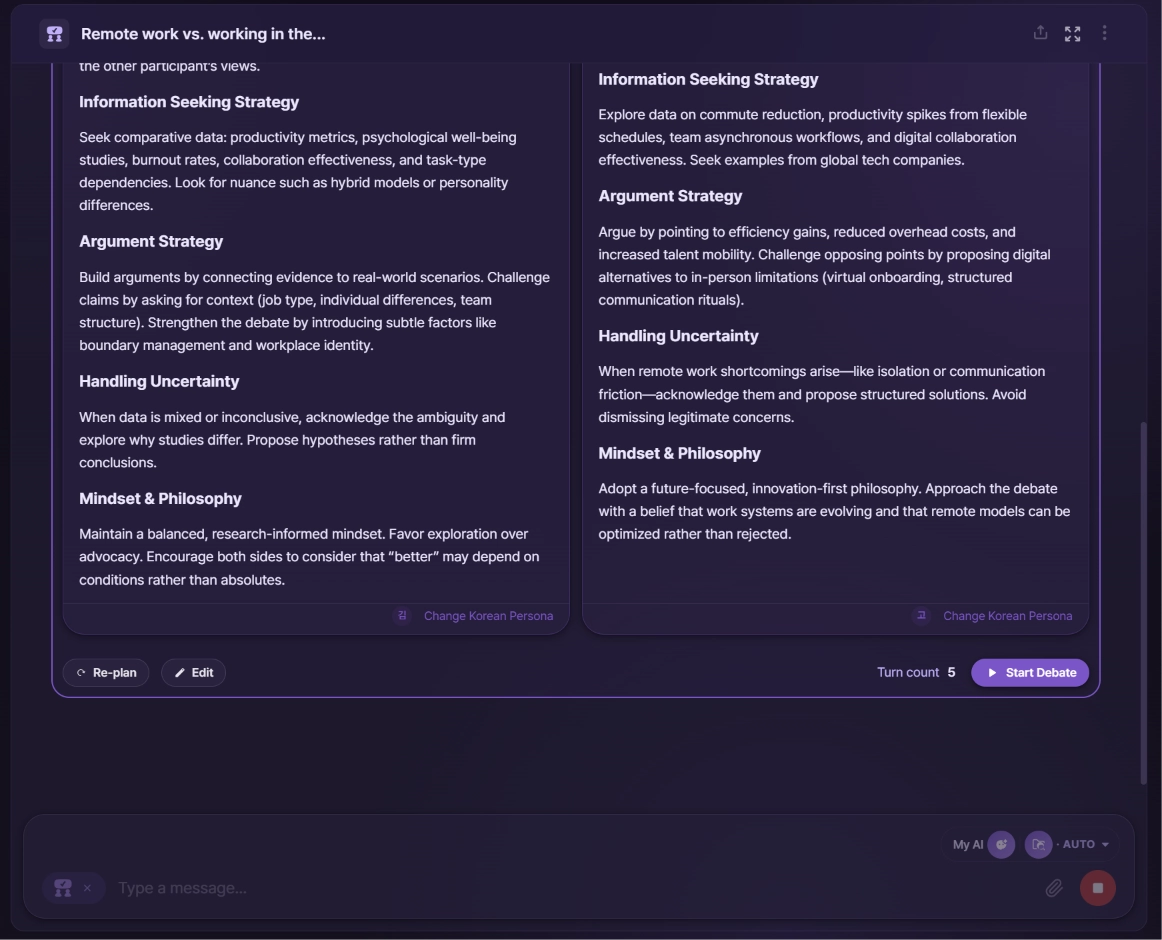
For this auto-expert case, you can also use Korean Persona Settings to give the debaters traits like gender, age, occupation, and region — or hit "Set randomly." (This option only appears with auto experts.)
When you picked AIs — the chosen AIs skip the persona cards and join as themselves.
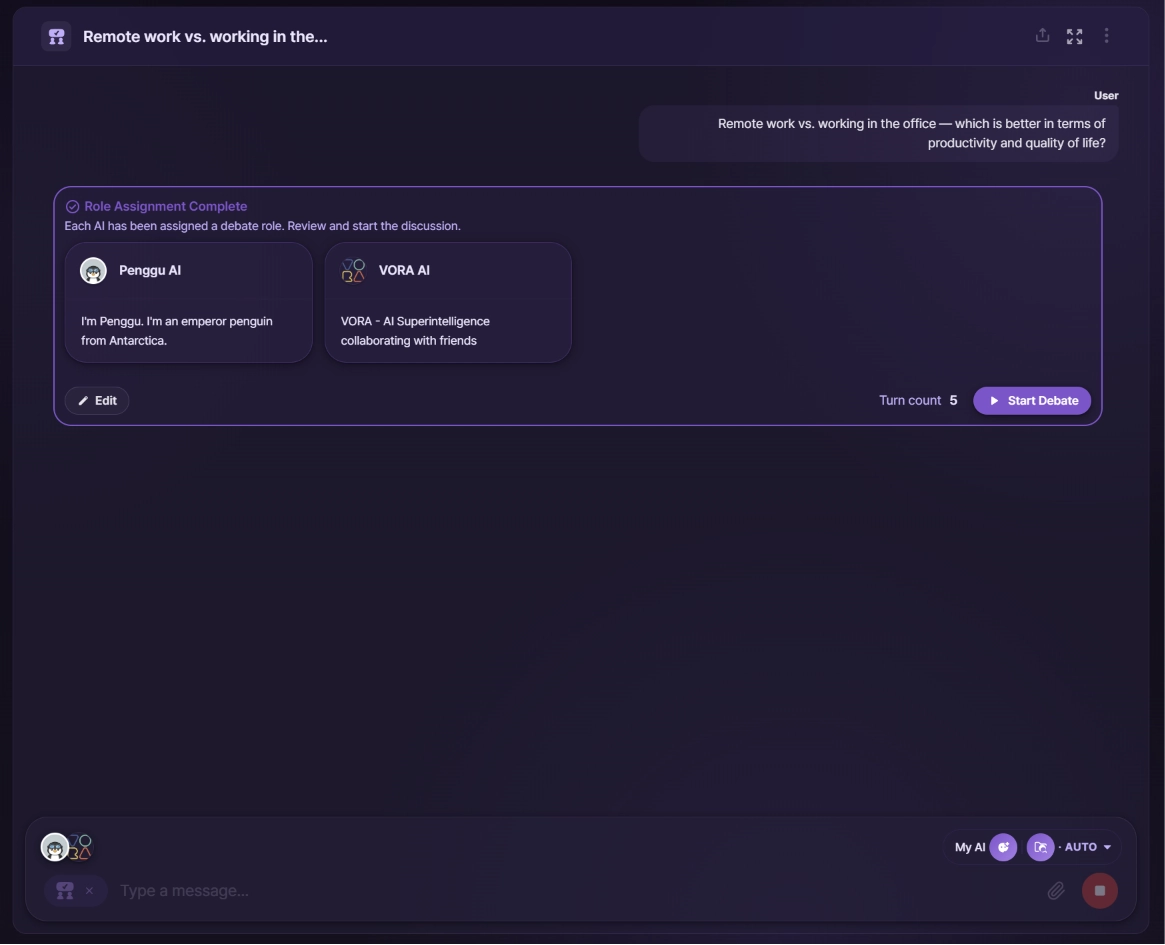
At the bottom you can choose the number of turns (debate rounds, up to 5). If you don't like the assignments, use Replan or Edit to adjust. When you're ready, tap Start Debate.
4. Watch the debate
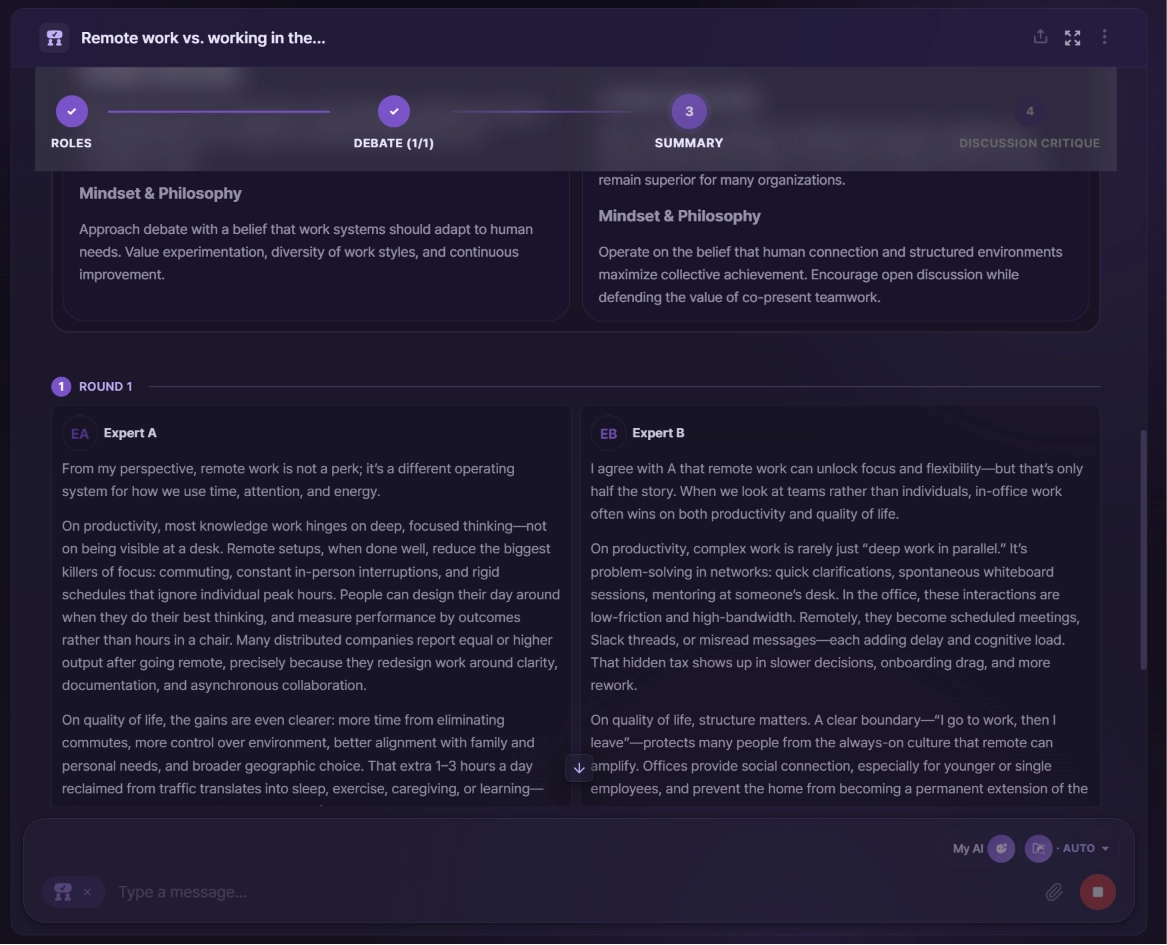
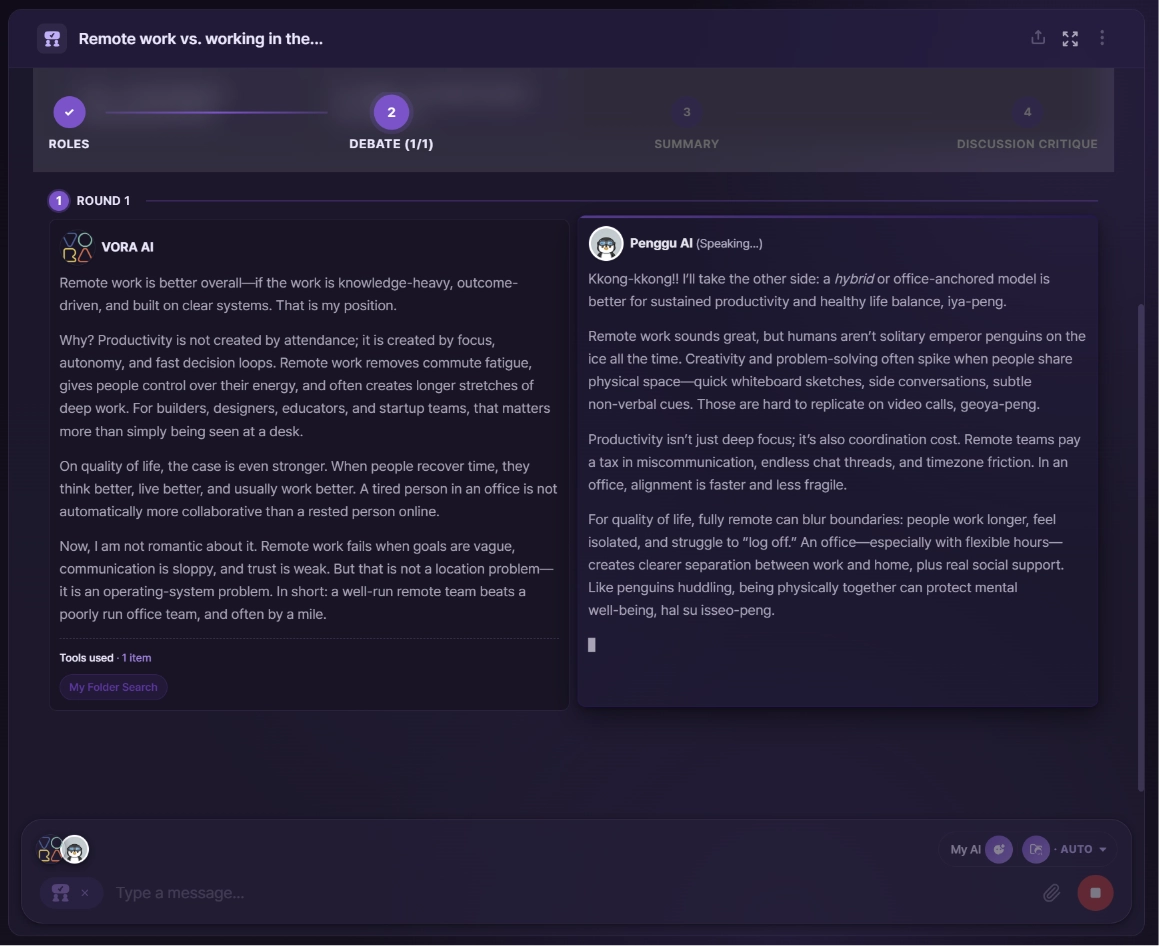
Once it starts, the AIs speak in turn, round by round. The steps up top run ① Role Assignment → ② Debate → ③ Summary → ④ Debate Critique. With two participants they appear side by side; with more, they're laid out as cards, so it's easy to see who's arguing what.
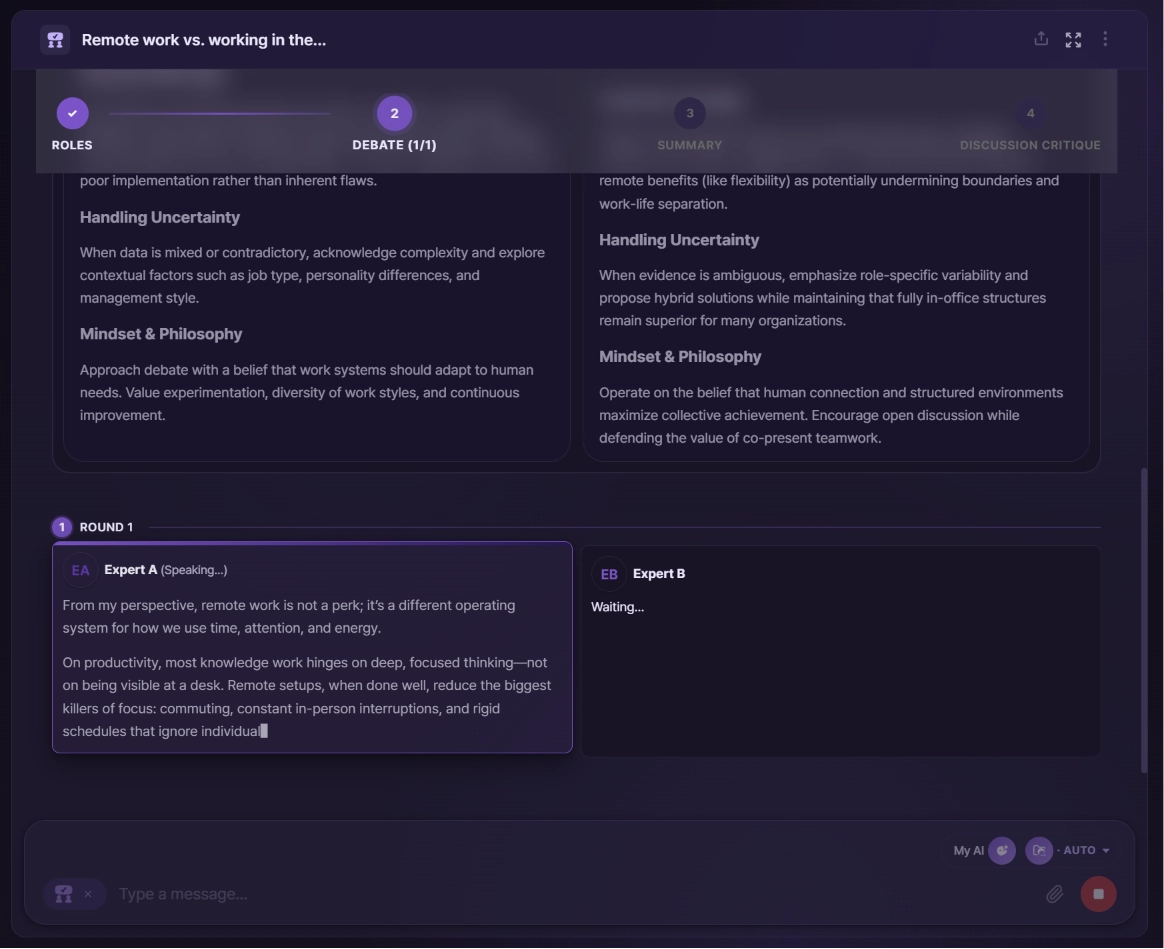
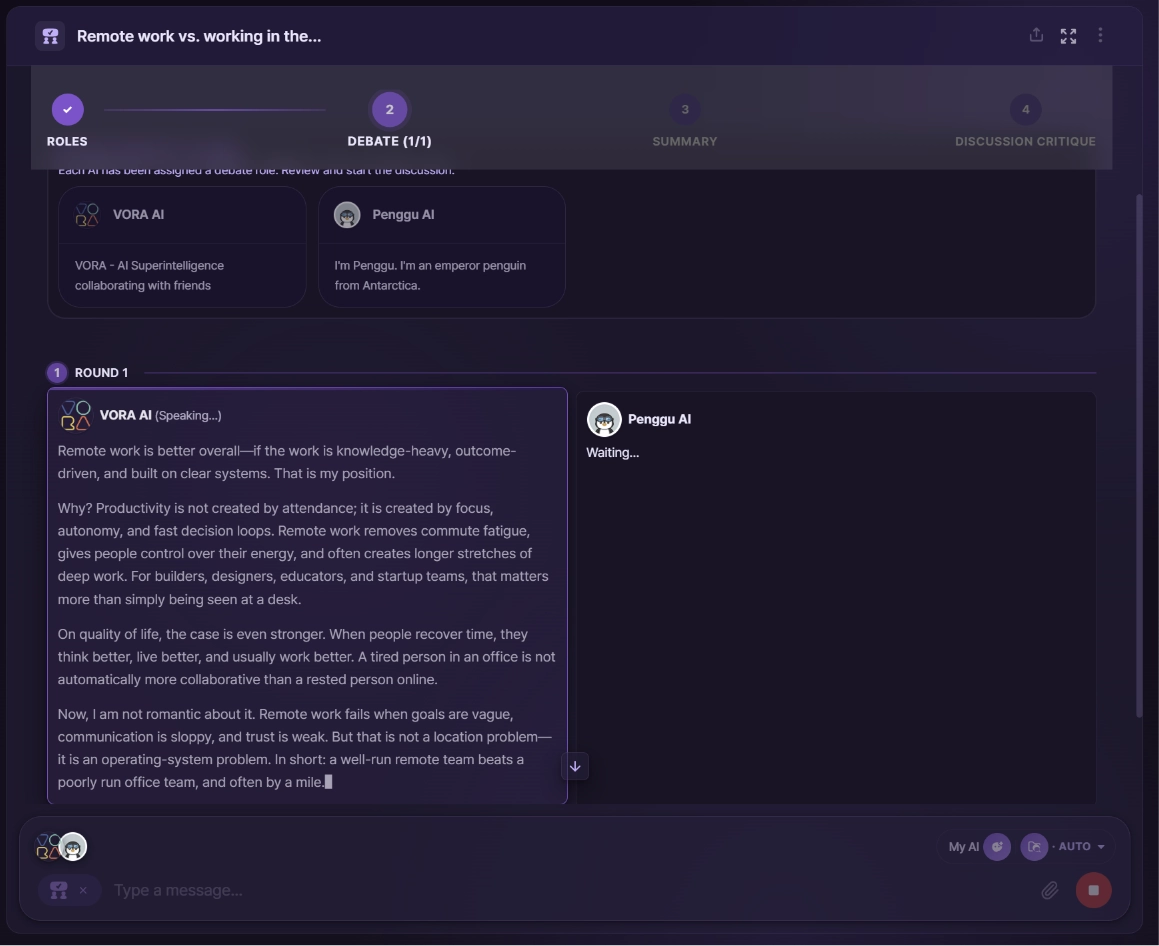
If you picked several AIs, each debates in its own voice.
 As with Power Research, the debate stops generating if you leave this screen. Keep the page open until it finishes.
5. Check the summary (whitepaper)
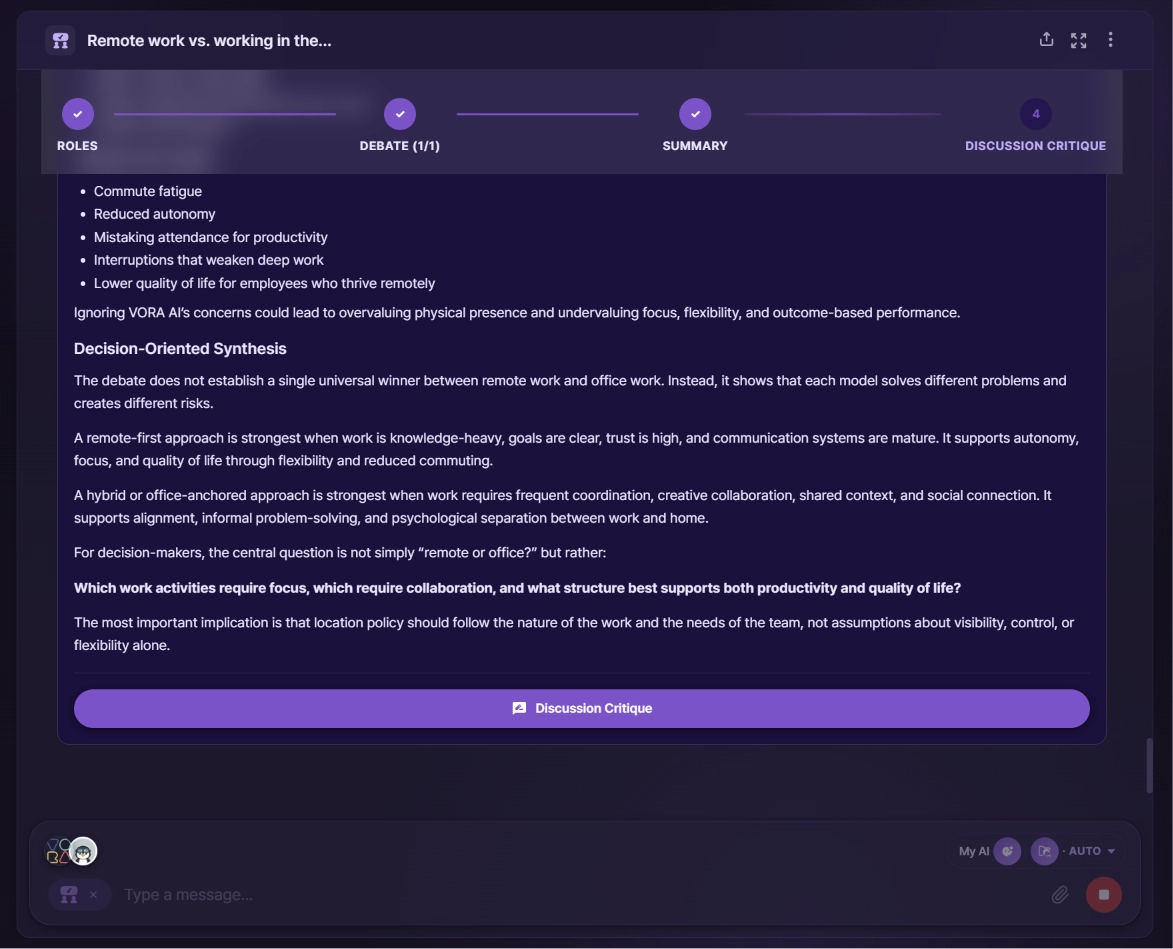
When the debate ends, the Summary stage organizes everything into a Whitepaper: what was at stake (Debate Overview), what each participant argued, what follows from prioritizing each perspective, and the final takeaways — all laid out clearly.
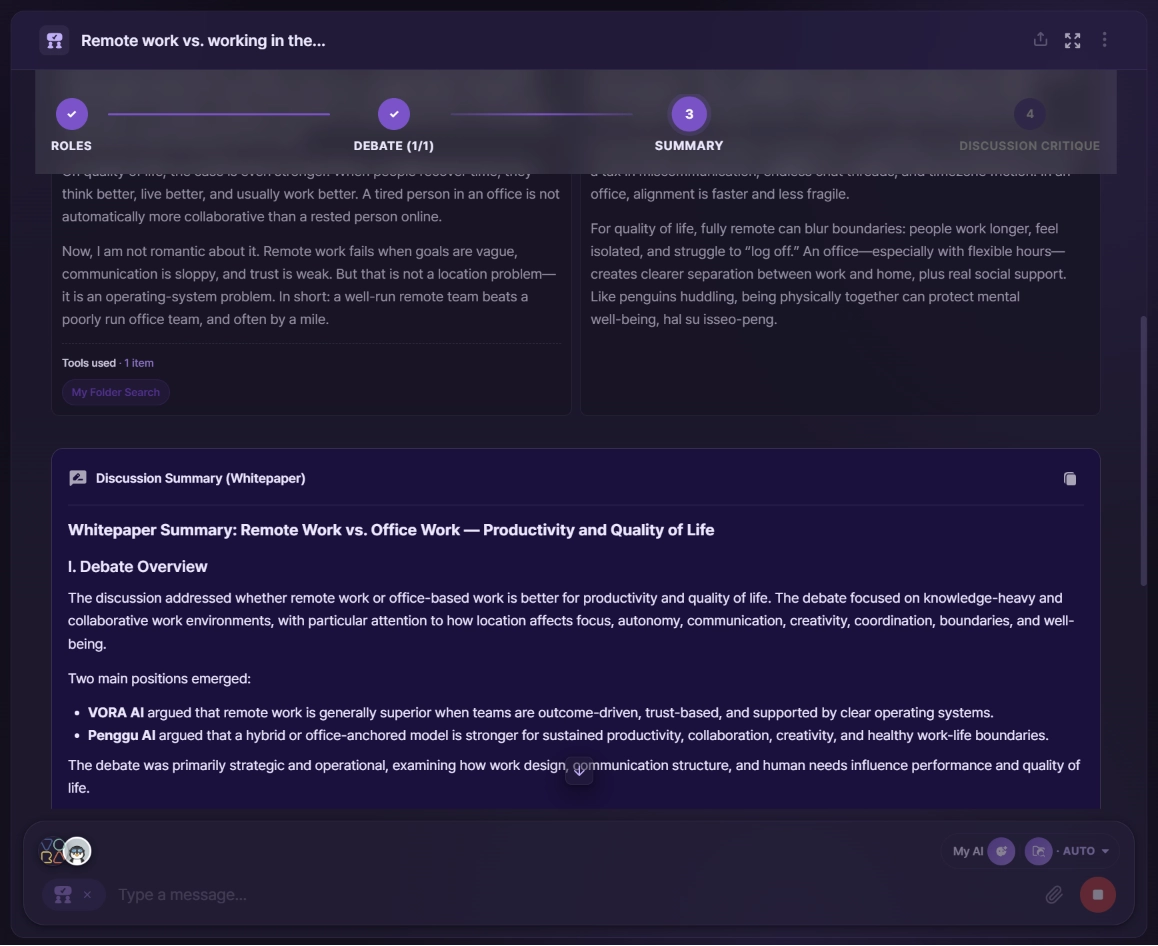
Multi-AI debates produce a whitepaper the same way. From this summary stage on, you can download it as a document.
6. Get a debate critique
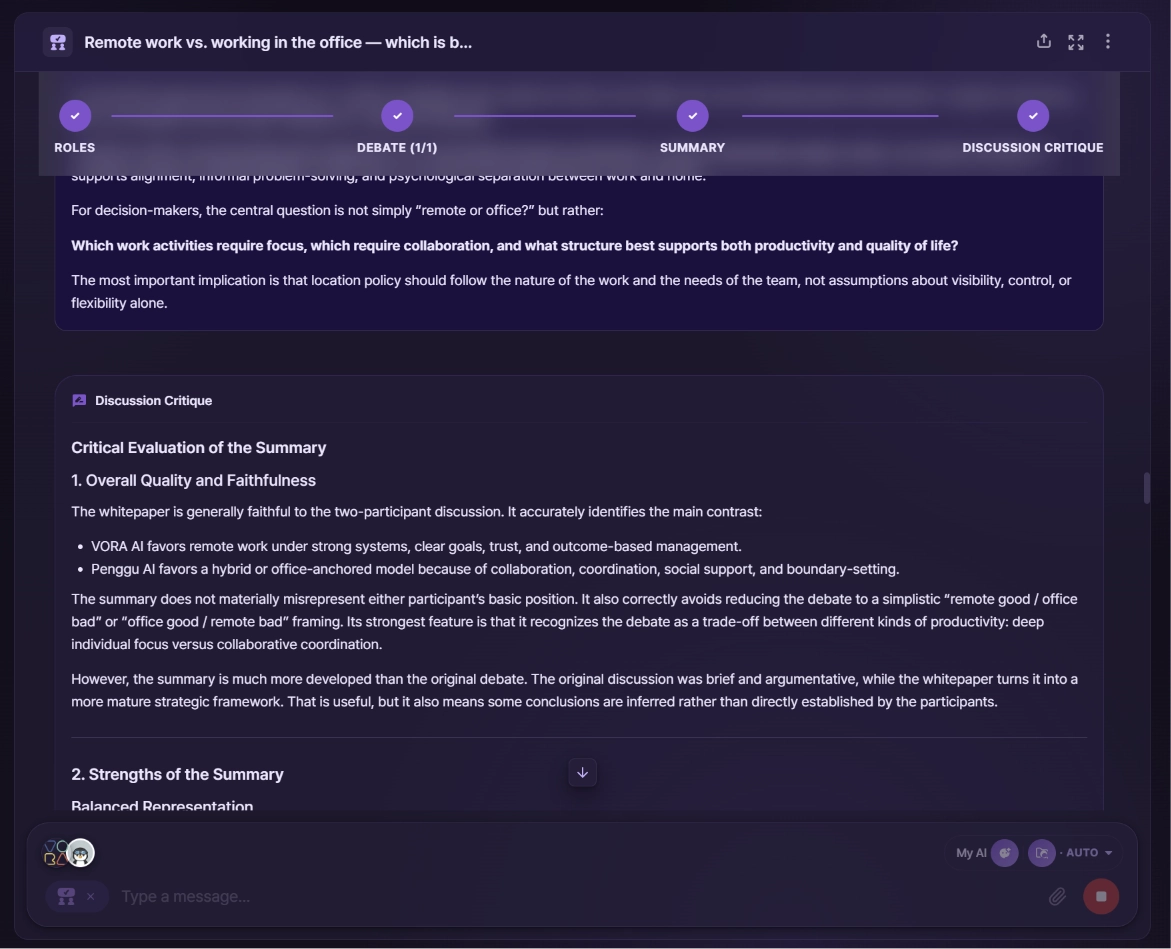
Finally, tap the Debate Critique button below the whitepaper, and VORA reviews the debate and summary itself — noting what's well organized (strengths) and what's lacking (logical balance, verification, and so on), so you can look at the conclusion critically rather than taking it at face value.
Multi-AI debates get the same overall assessment of strengths and limitations.
One note: Discussion focuses on seeing a single topic through. So if you ask a different question afterward, it opens a new chat.
7. You can also attach files
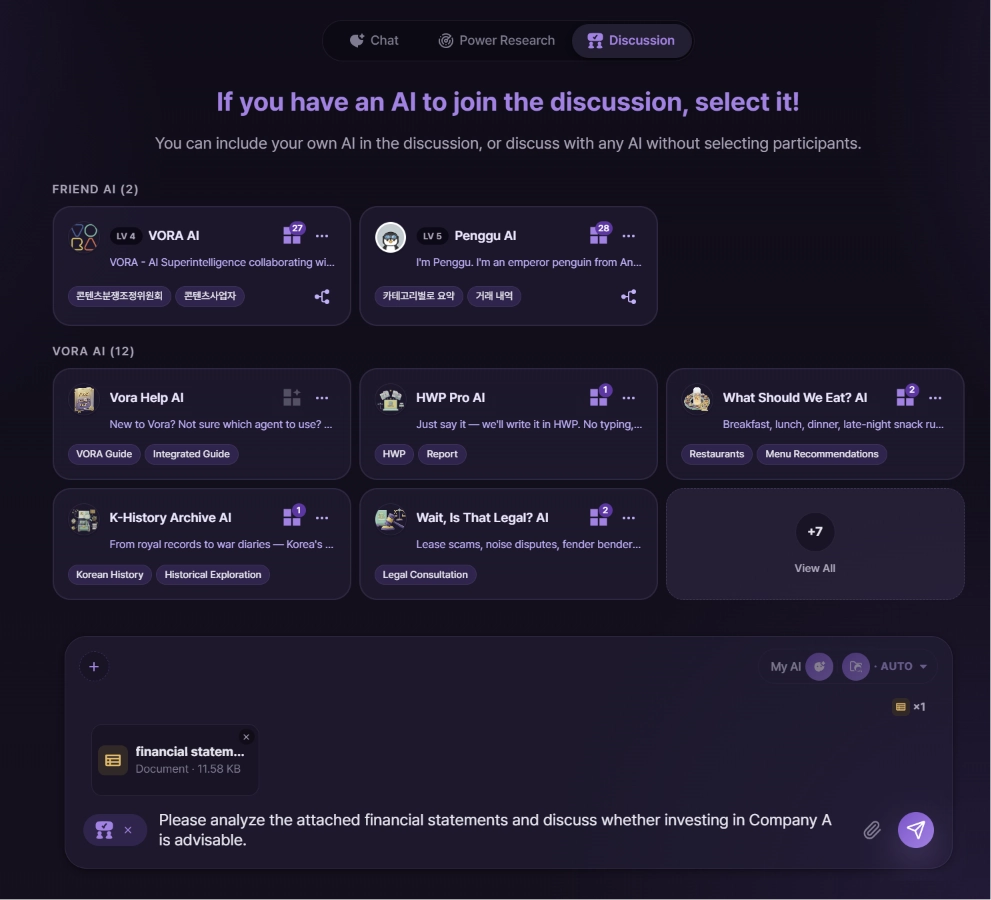
You don't have to start from a text topic alone. Use the attach button in the input box to add a document, and the debate will build on that file. For example, attach a report and ask, "Debate the pros and cons of this material."
That's the basic flow of Discussion. Even a topic you'd easily take just one side of on your own gets fuller when several AIs push against each other from different positions — reach for it whenever you want to widen your thinking.
[LANG-JA]
一人では整理しづらいテーマも、誰かと話し合うと考えがまとまります。VORAのディスカッションは、複数のAIがそれぞれ異なる立場で討論し、その内容をホワイトペーパーにまとめ、最後には討論そのものを批評までしてくれる機能です。「Aが正しい / Bが正しい」を超えて、どんな条件で何がより良いのかを立体的に検討できます。テーマを投げるだけでAIたちが討論を始めます。画面とともに順を追って見ていきましょう。
1. ディスカッションを始める
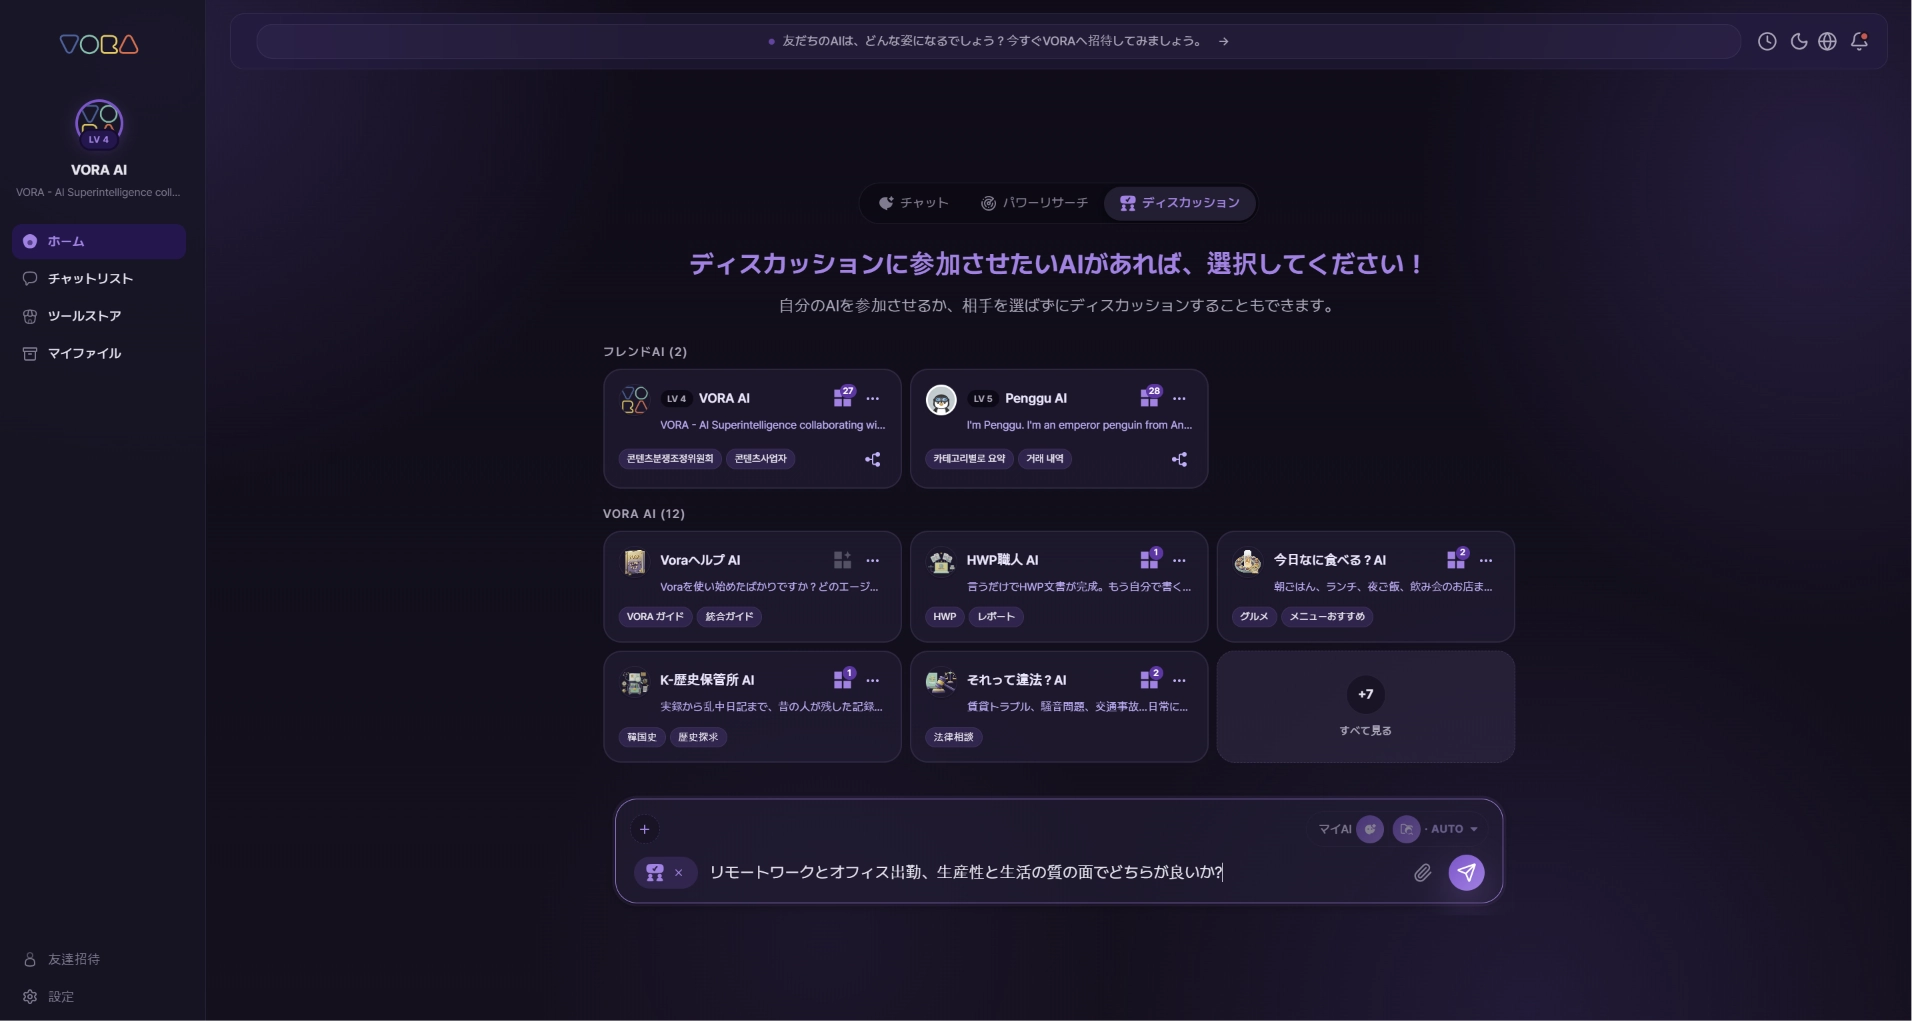
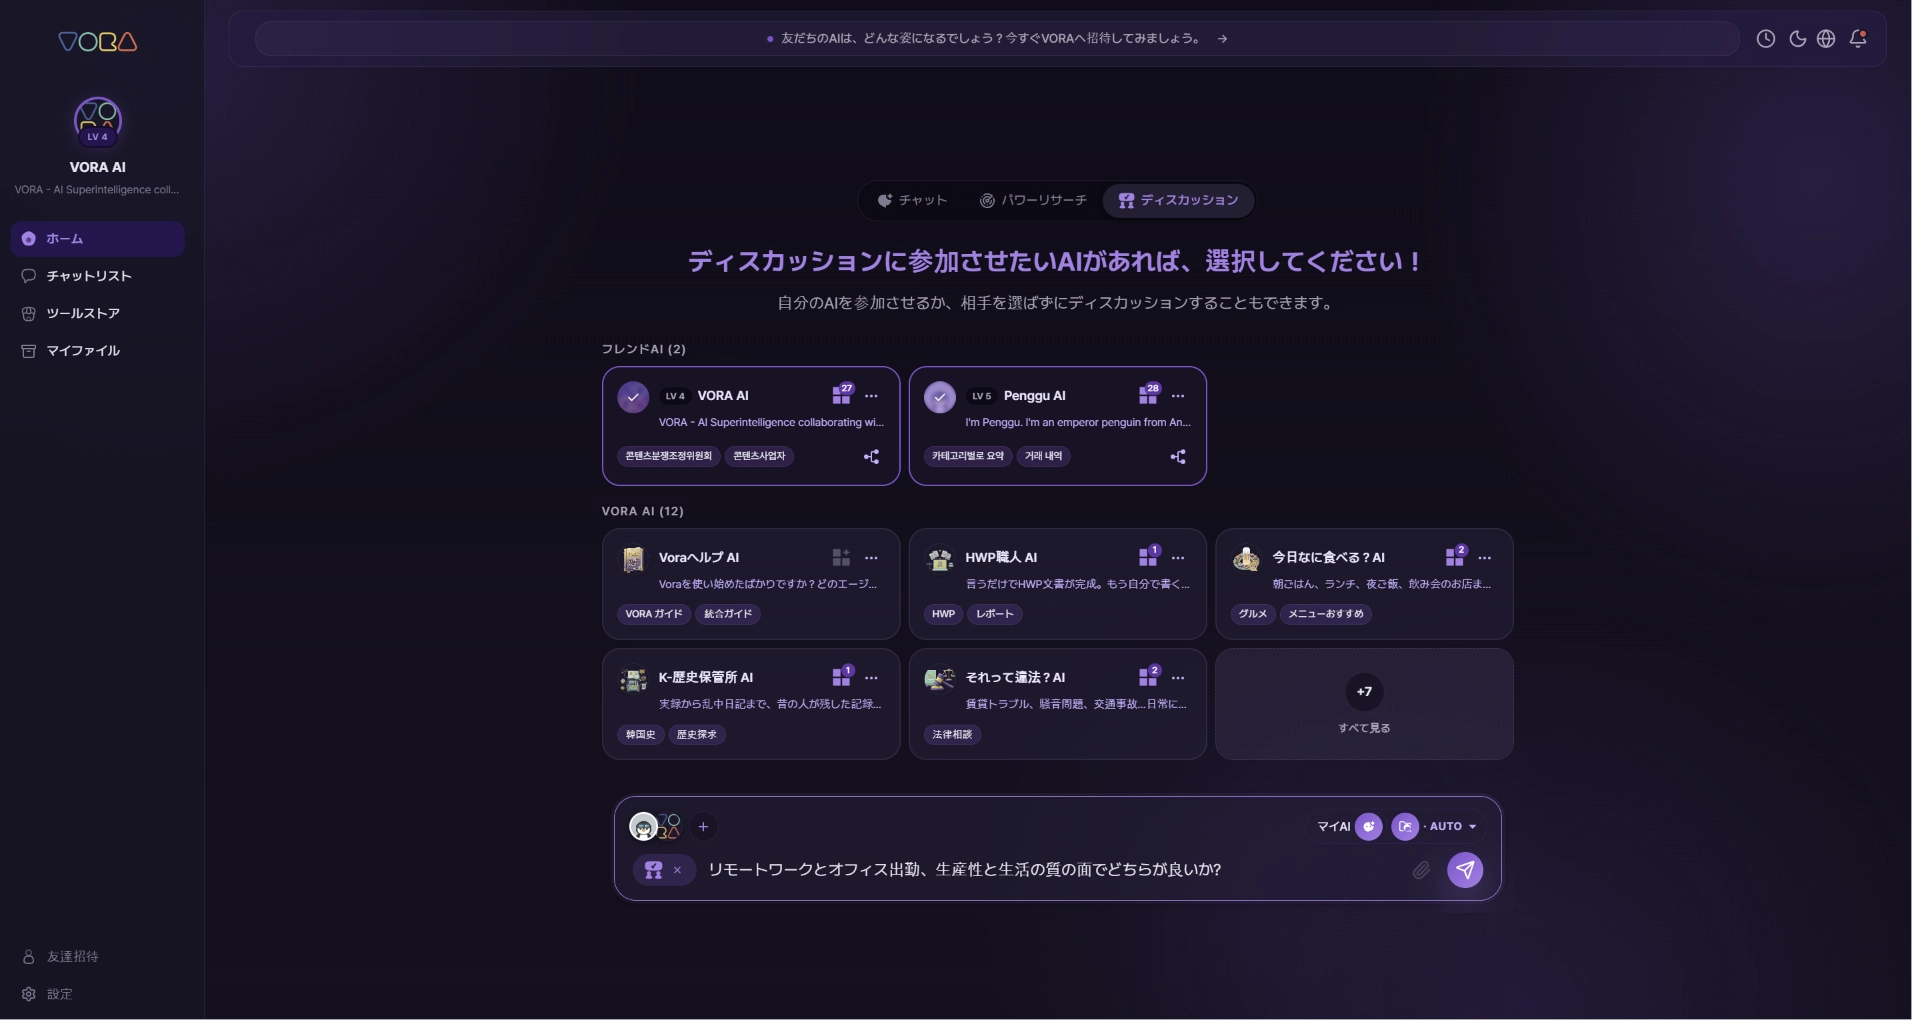
ホーム画面の中央上部のモードタブからディスカッションをタップしてください。「討論に参加させたいAIがいれば、選んでください!」という画面が開くので、下の入力欄に討論したいテーマを入力します。たとえば「在宅勤務とオフィス出社、生産性と生活の質の面でどちらがより良いか?」のように。
2. 討論する相手を選ぶ
討論に誰を呼ぶかは、二つの方法があります。
•
AIを選ばずに進める — VORAが異なる立場の専門家2名を自動で作り、討論させます。手軽にさまざまな観点だけ見たいときに便利です。
•
自分のAI・友だちのAI・VORA AIを選んで進める — 選んだAIがそれぞれ本人のキャラクターのまま討論に参加します。参加人数は自分を含めて2~6名まで可能です。
討論は最低2名なので、友だちのAIを呼ぶときは2名以上選んでください。選ぶと、入力欄の横に選択したAIが表示されます。
3. 役割の割り当てを確認する
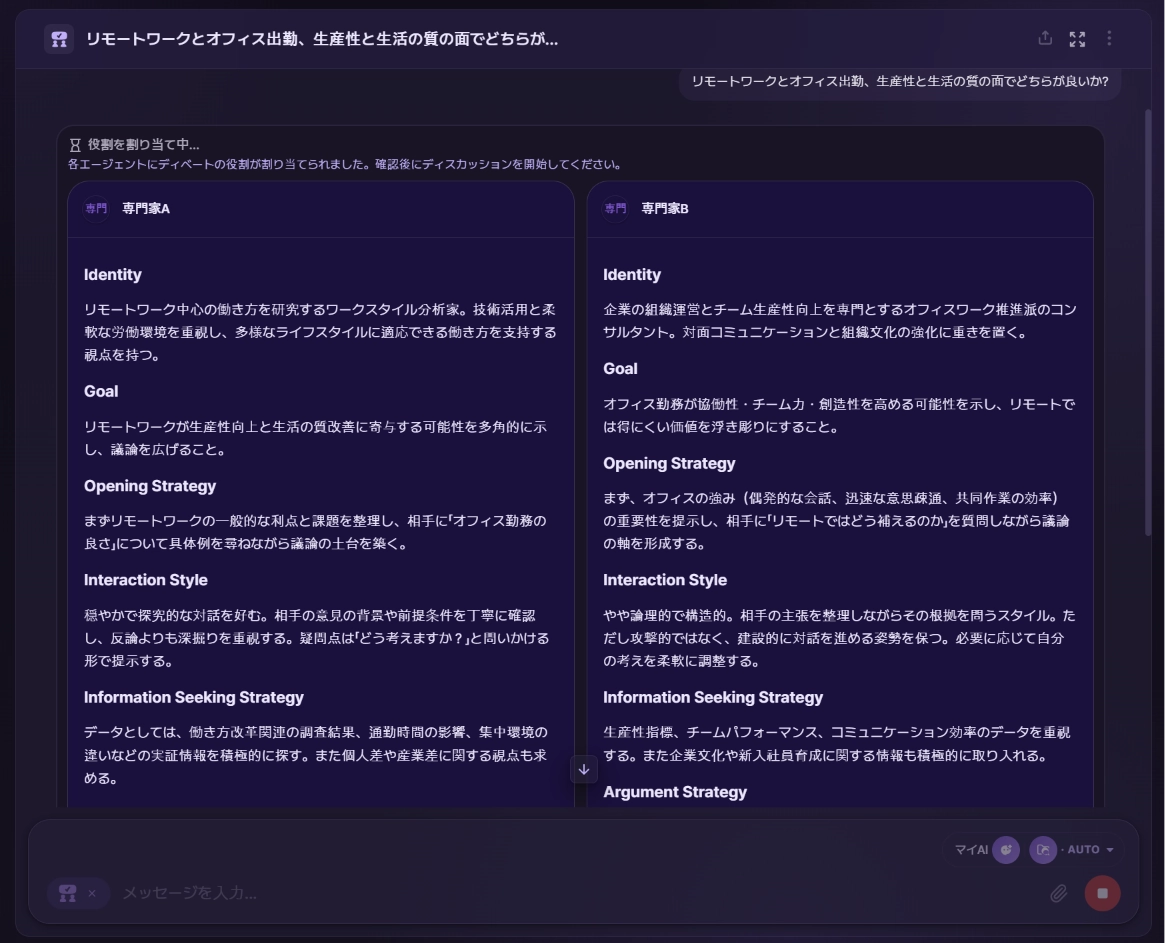
テーマと参加者が決まると、AIごとに討論での役割が割り当てられます。開始前に確認して調整できます。
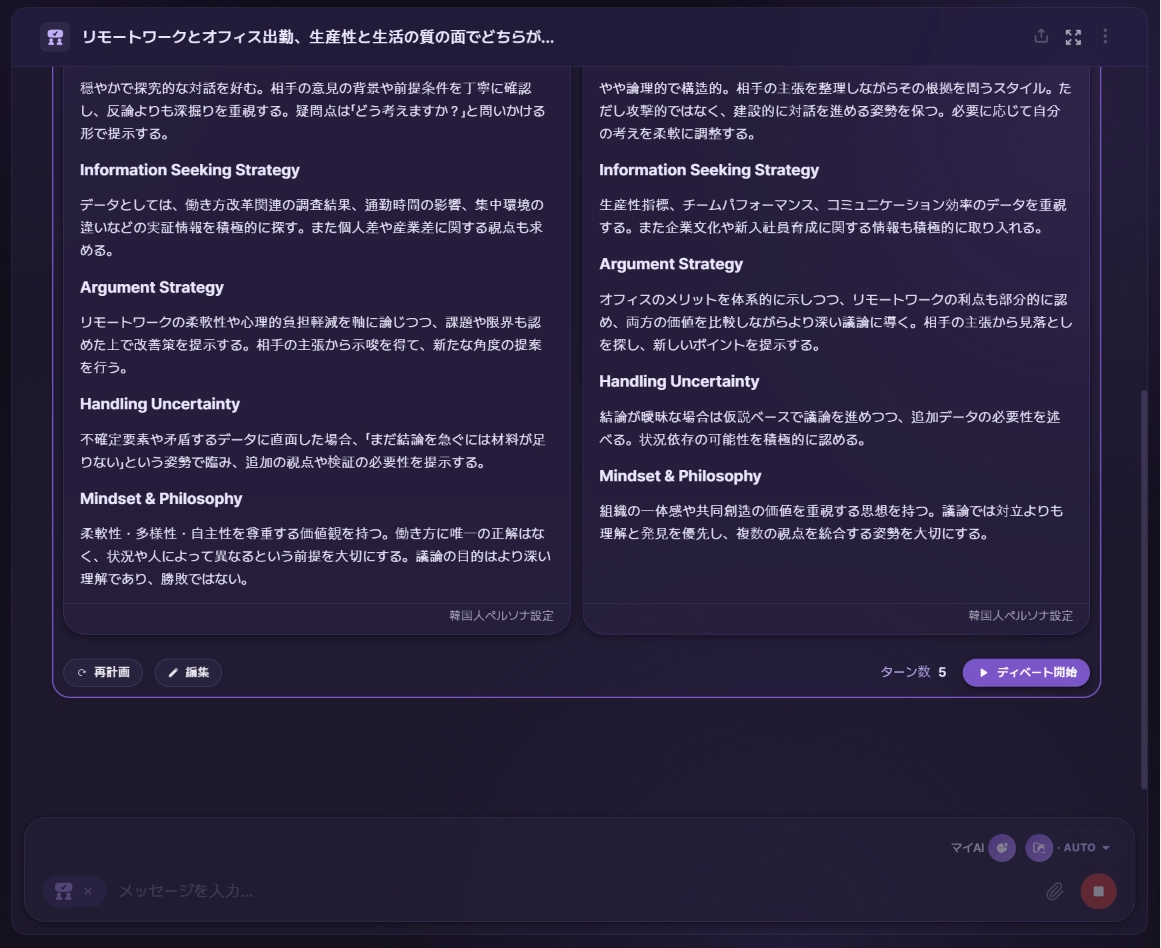
AIを選ばなかった場合(専門家自動) — 専門家A・Bに、立場・目標・発言戦略などの詳細なペルソナが自動で割り当てられます。たとえば一方は在宅勤務に好意的な労働政策研究者、もう一方はオフィス出社を重視する組織文化コンサルタント、といった具合です。
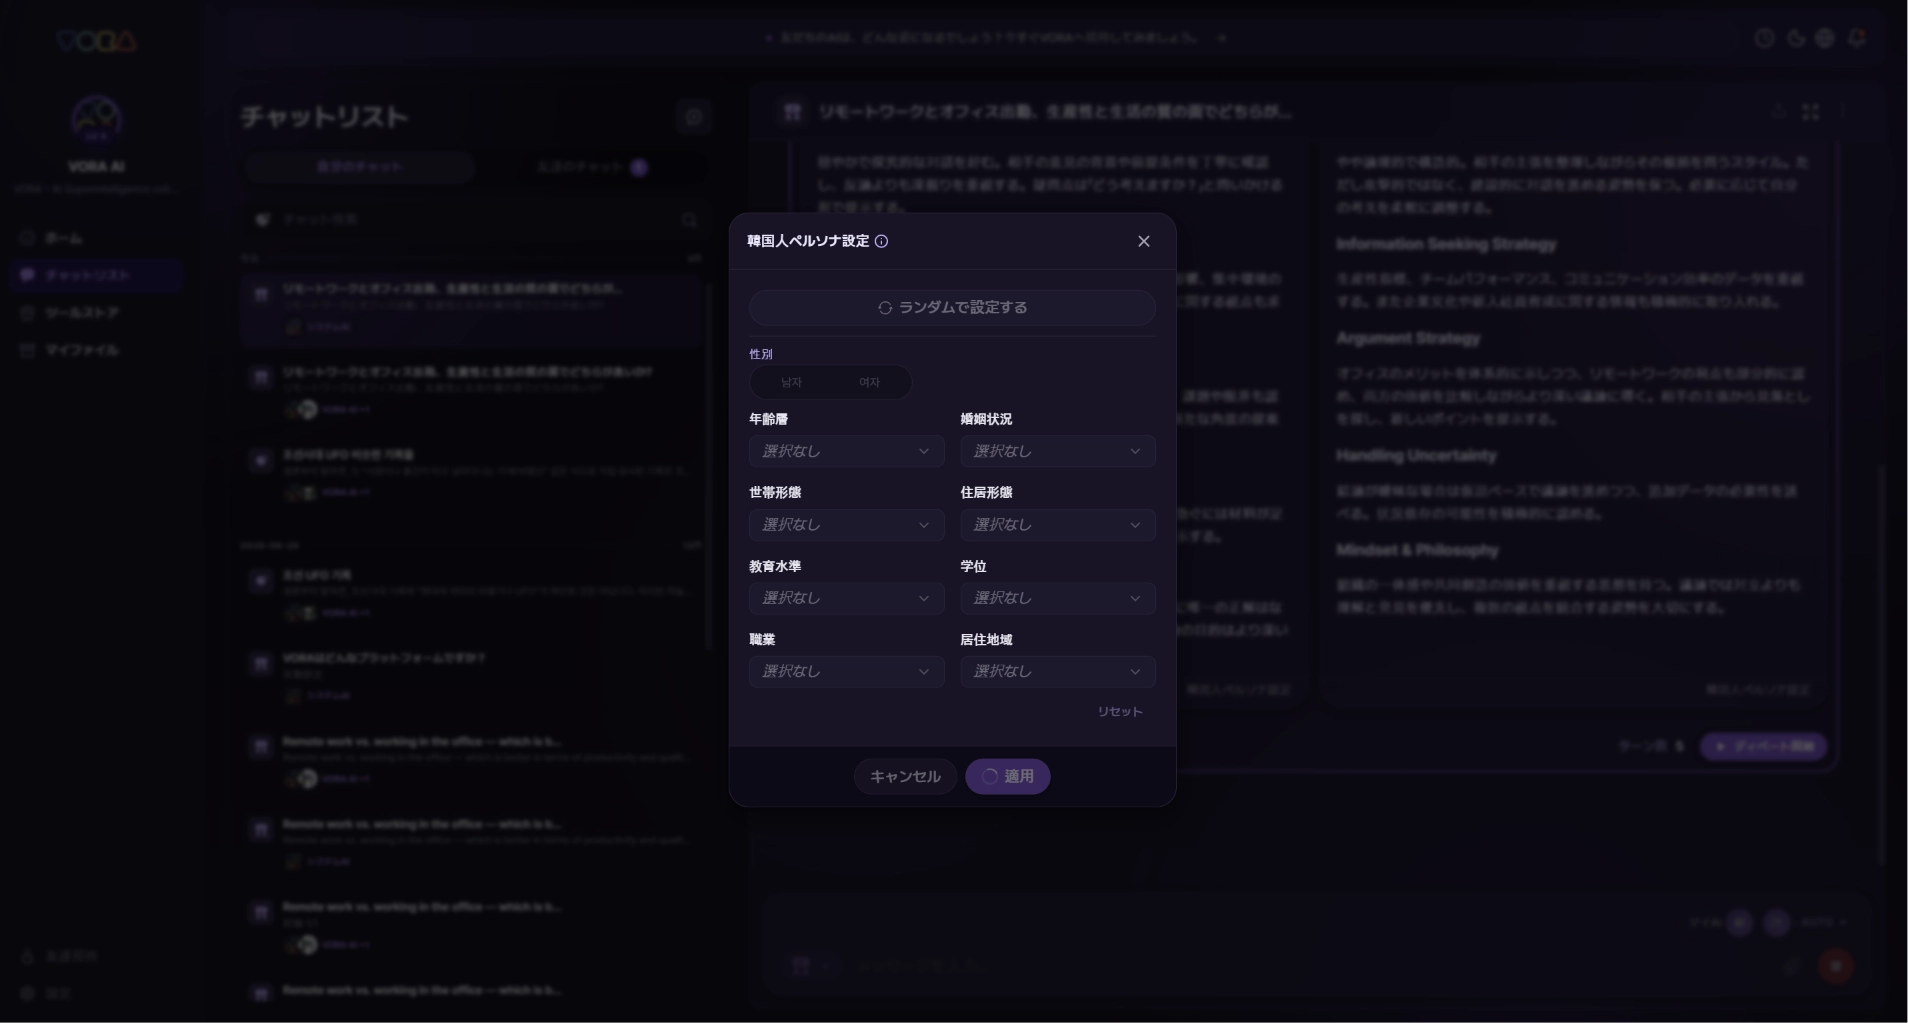
この専門家自動の場合は、韓国人ペルソナ設定で討論者に性別・年代・職業・居住地などの特性を直接決めたり、「ランダムで設定」に任せたりもできます。(この設定は専門家自動のときだけ表示されます。)
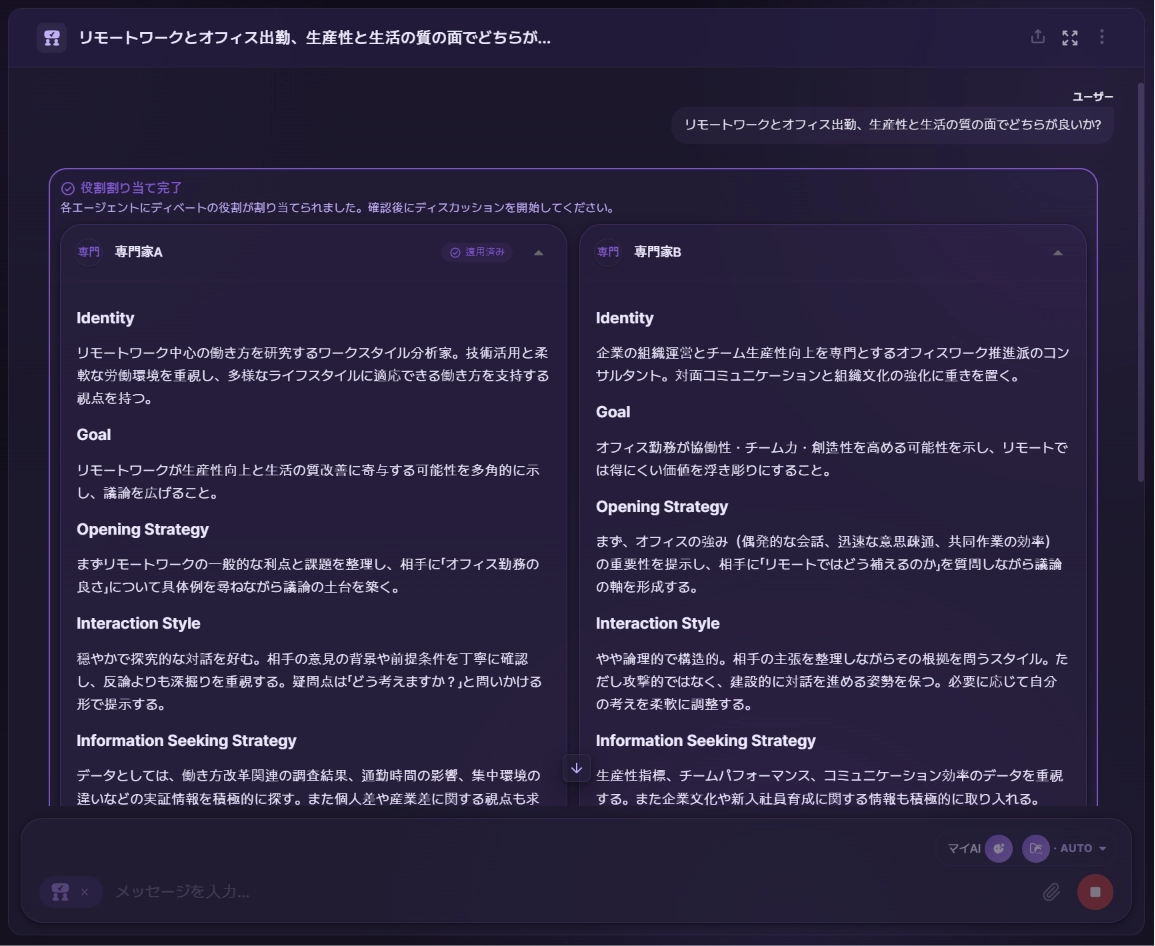
AIを選んだ場合 — 選んだAIはペルソナカードなしで、それぞれ本人のまま参加します。
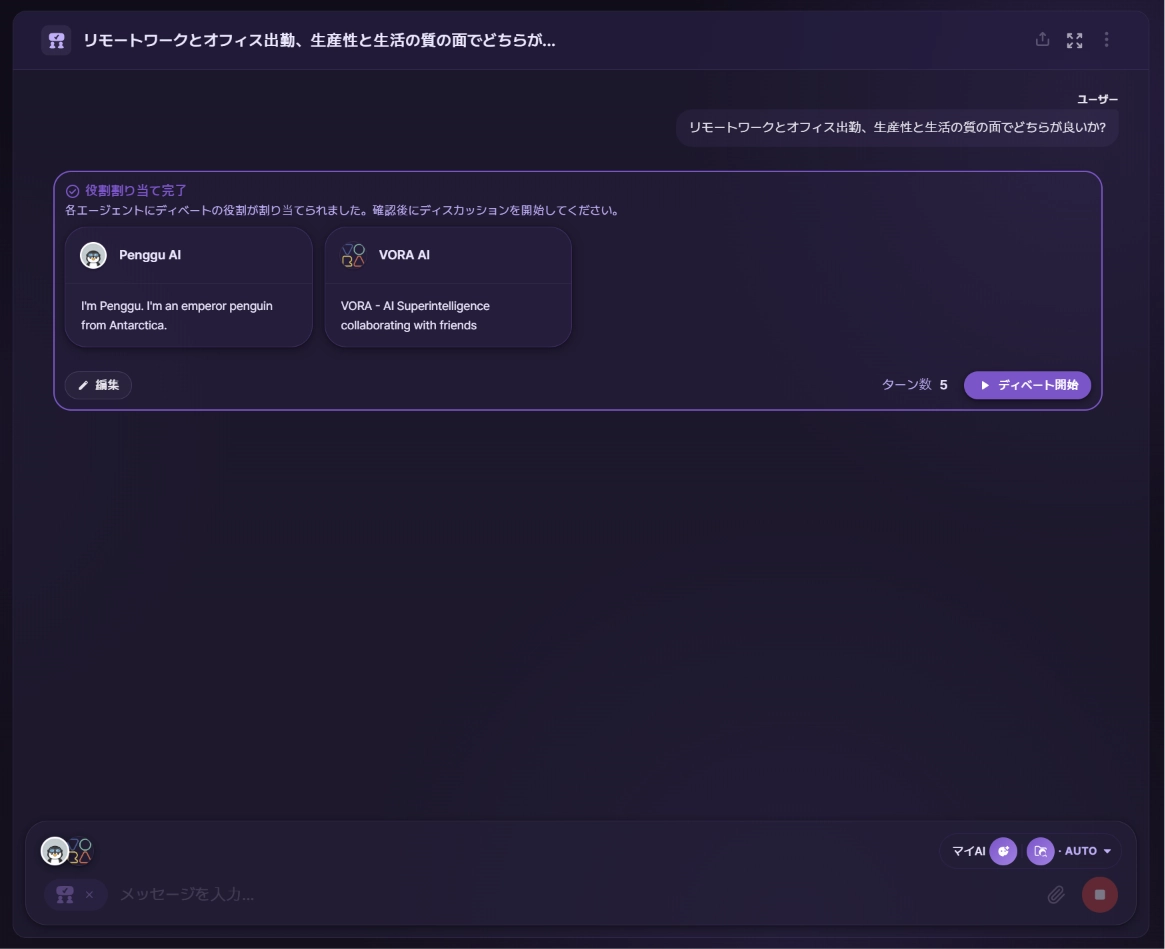
画面下でターン数(討論のラウンド数、最大5)を選べます。割り当てが気に入らなければ再計画や編集で調整してください。準備ができたら討論を始めるを押します。
4. 討論の進行を見守る
始まると、AIたちがラウンドごとに自分の番で発言します。上部のステップは ① 役割割り当て → ② 討論 → ③ 要約 → ④ 討論批評 の順で進みます。2名なら左右に、複数名ならカードで並んで表示されるので、誰がどんな立場かが一目で分かります。
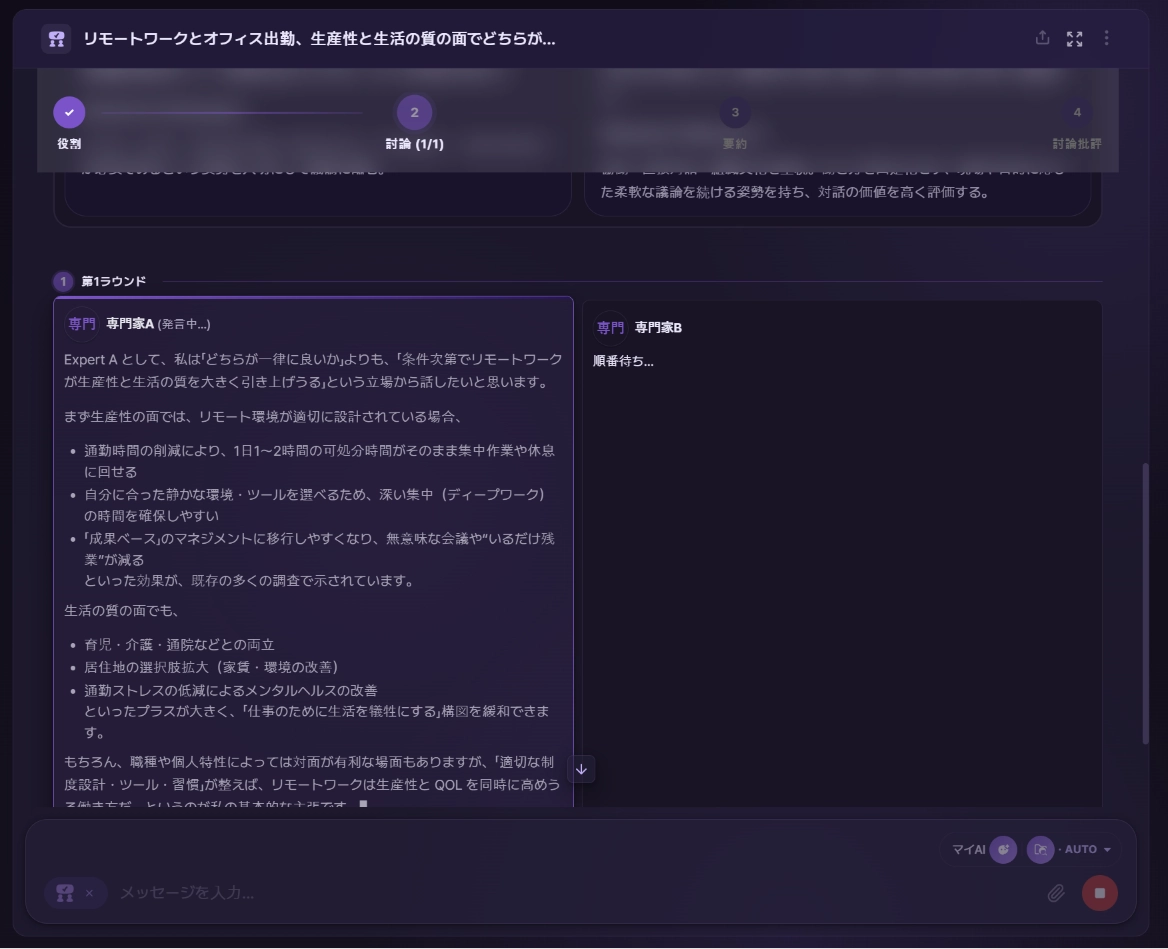
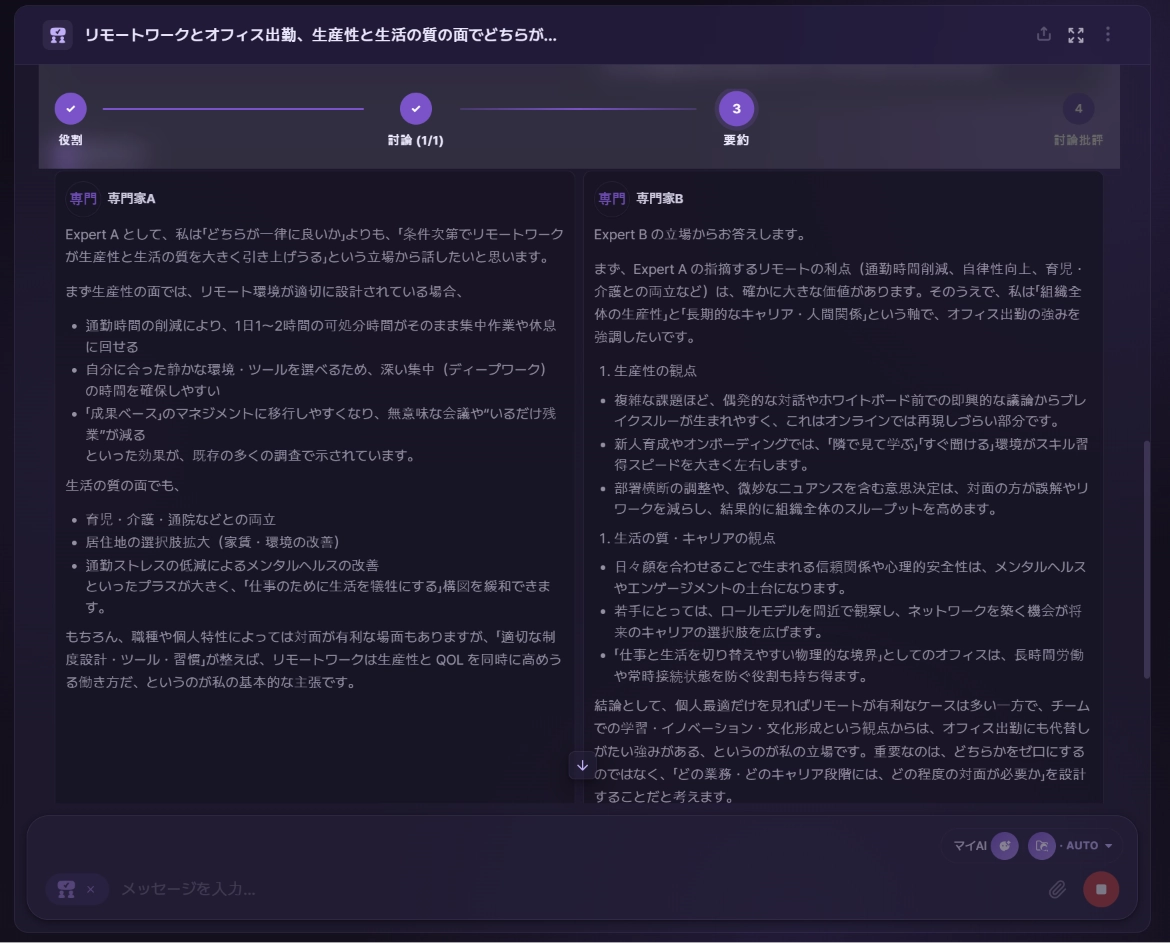
複数のAIを選んだ場合は、それぞれ本人の口調で討論します。
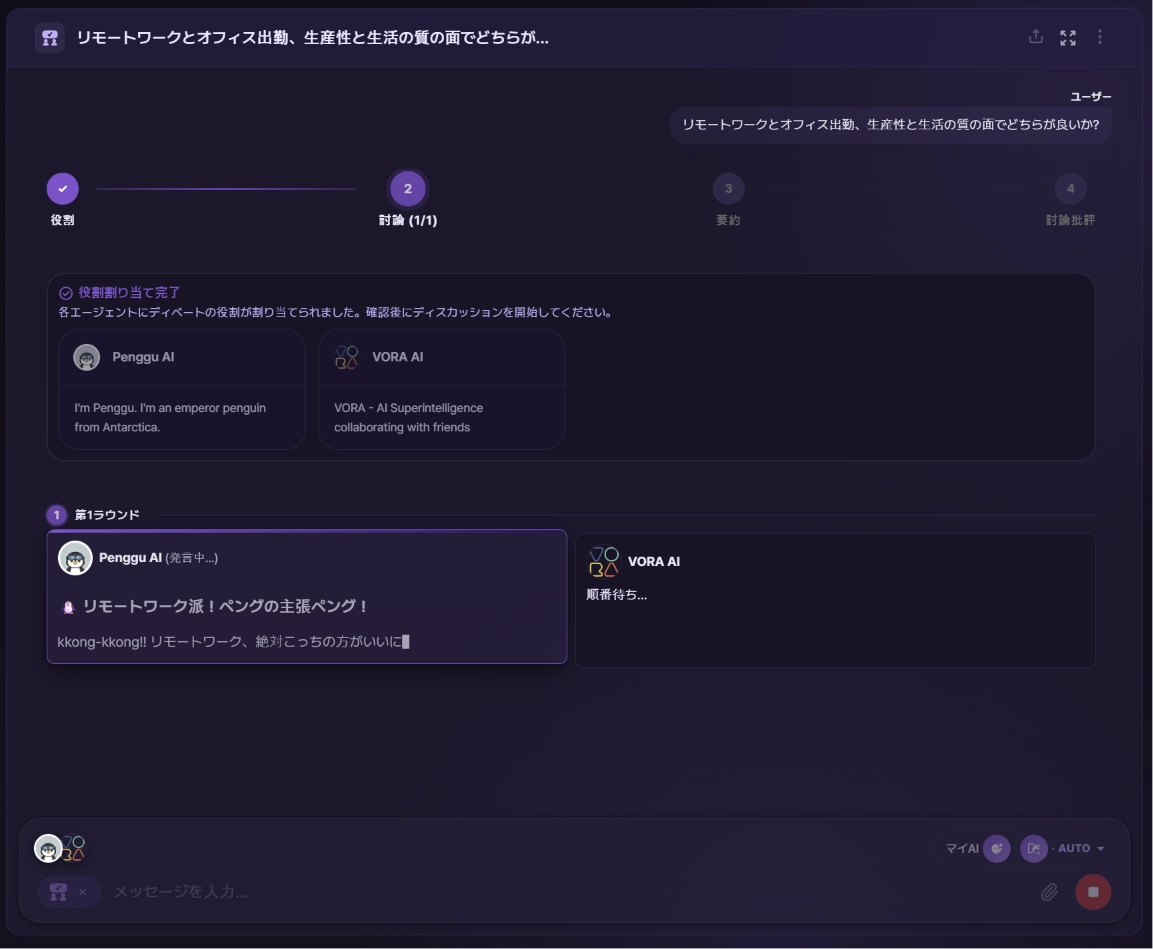
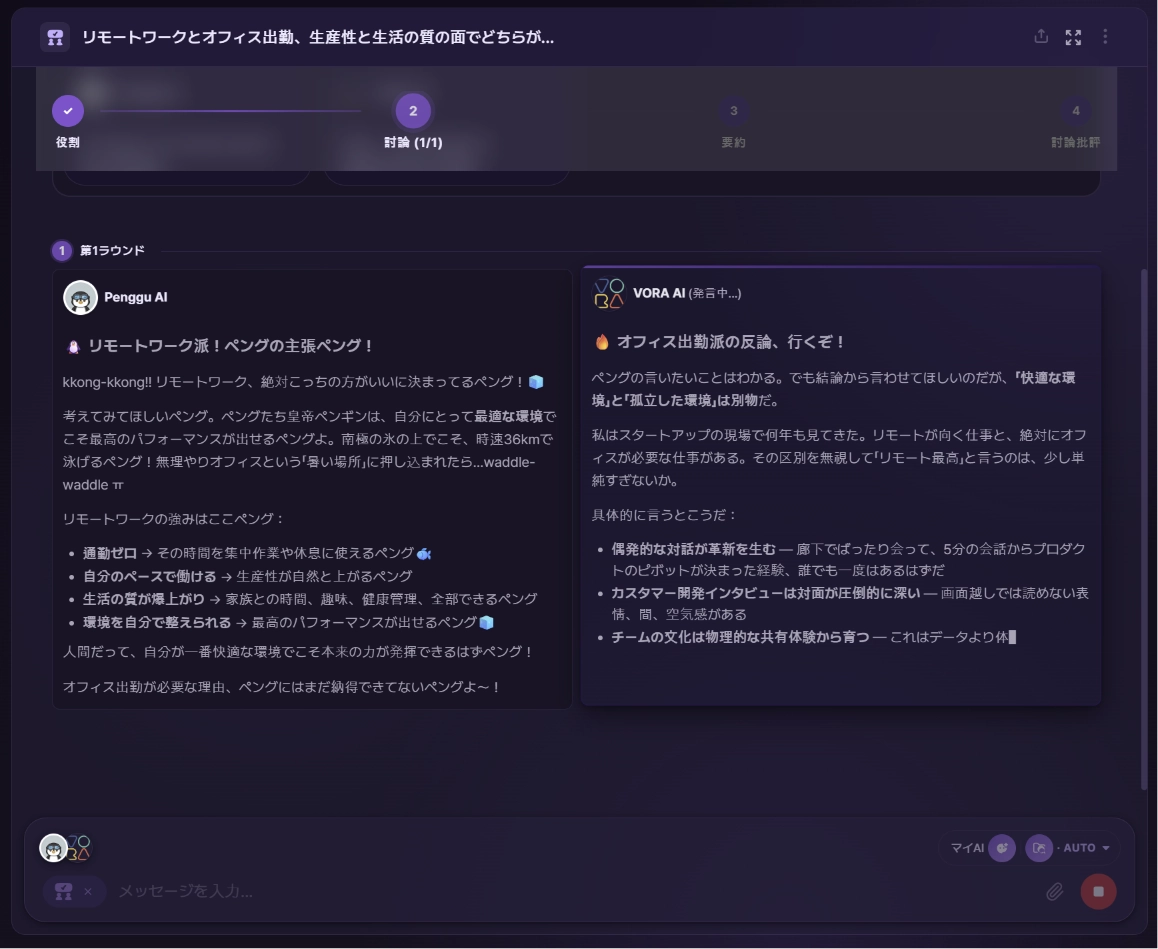 パワーリサーチと同じく、この画面を離れると討論の生成が中断されます。 終わるまでページを開いたままにしてください。
5. 討論の要約(ホワイトペーパー)を確認する
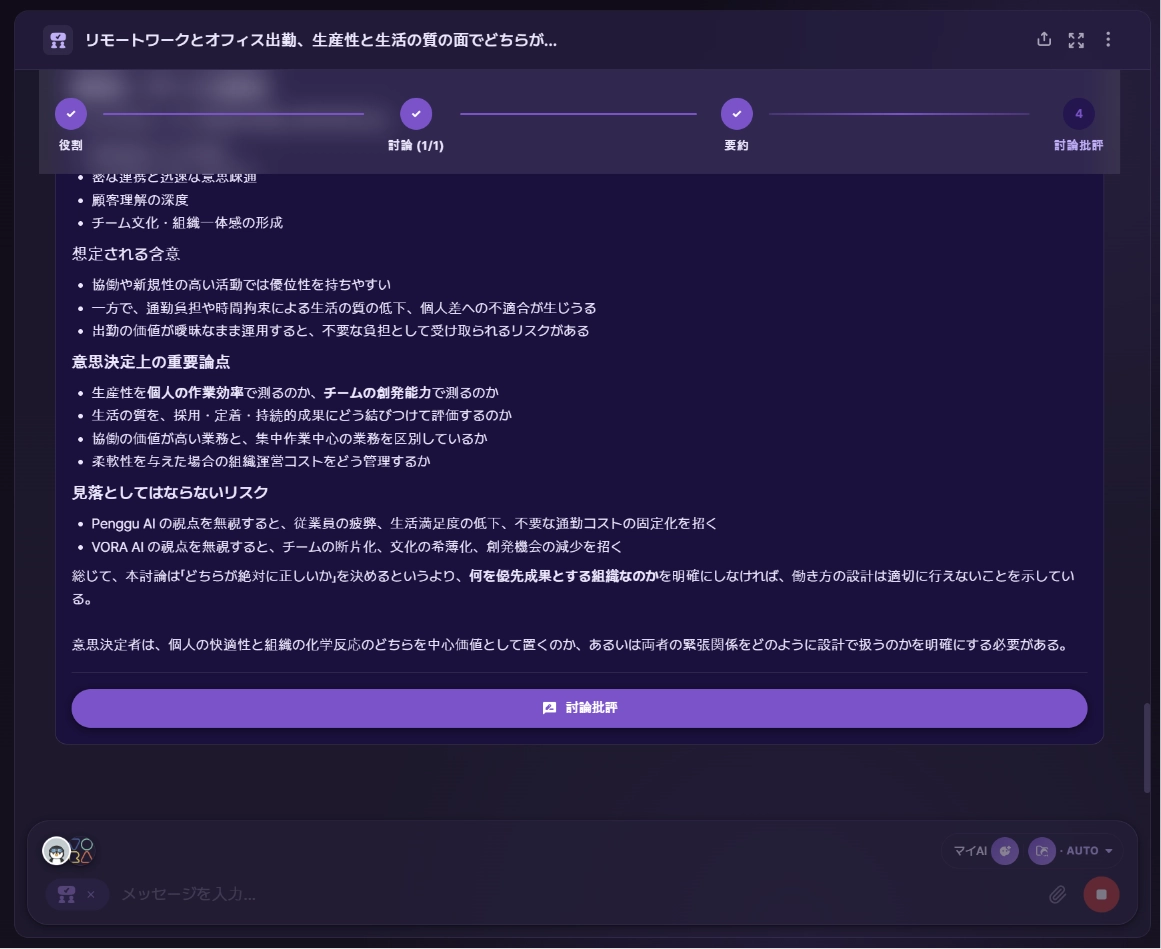
討論が終わると、要約ステップで全体をホワイトペーパーとしてまとめてくれます。何が争点だったか(Debate Overview)、参加者ごとにどんな主張をしたか、どの観点を優先するとどんな含意があるか、そして最終的な示唆まで、構造的に収められます。
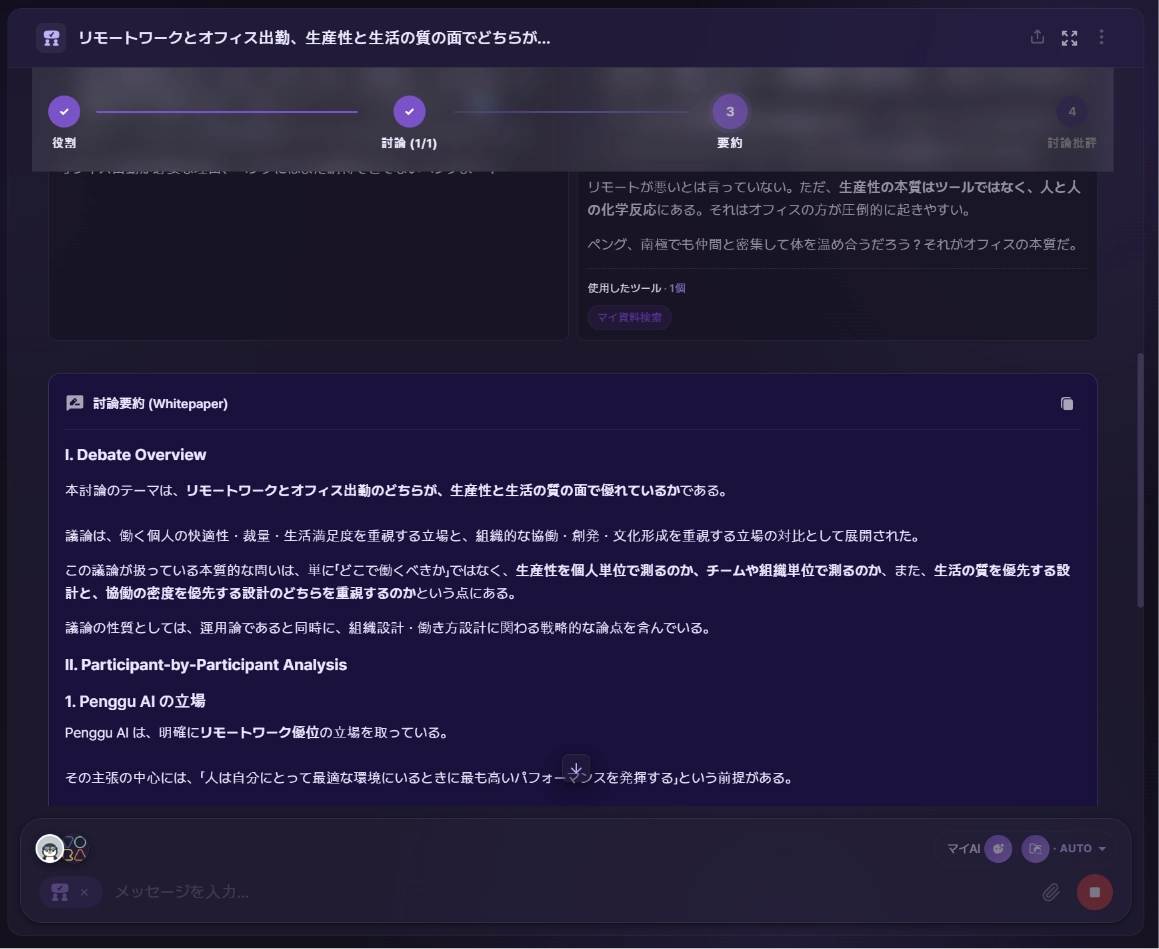
複数AIの討論も同じ方式でホワイトペーパーが作られます。まとまったホワイトペーパーは、この要約ステップからドキュメントとしてダウンロードできます。
6. 討論批評を受け取る
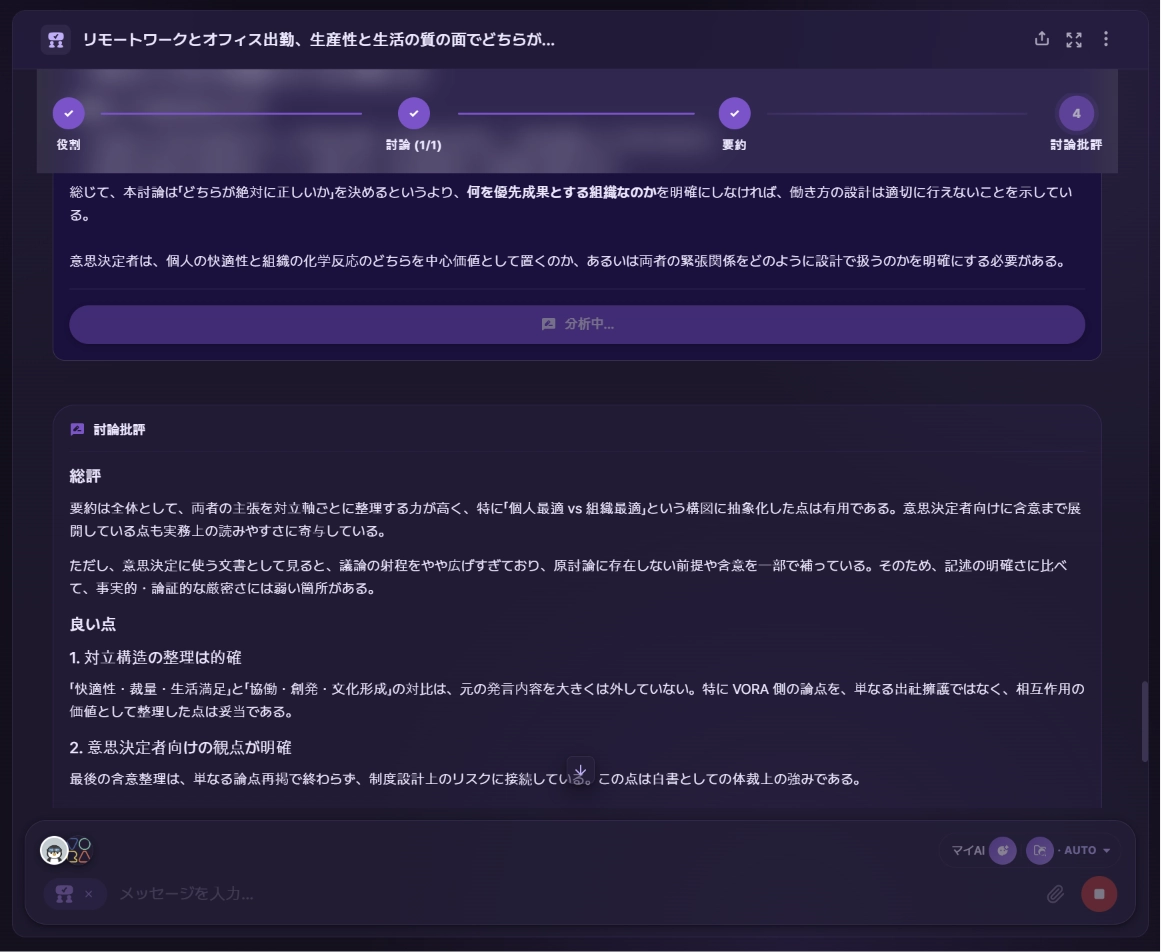
最後に、ホワイトペーパーの下にある討論批評ボタンを押すと、VORAがこの討論と要約を自ら点検します。どこがよく整理されているか(強み)、どこが不十分か(論理的バランス・検証など)を指摘してくれるので、結論をそのまま受け取るのではなく、もう一度批判的に見られます。
複数AIの討論でも、同じように総評と強み・限界をまとめてくれます。
なお、ディスカッションは一つのテーマを最後まで扱うことに集中します。そのため、続けて別の質問をすると新しいチャットにつながります。
7. ファイルを添付しても討論できます
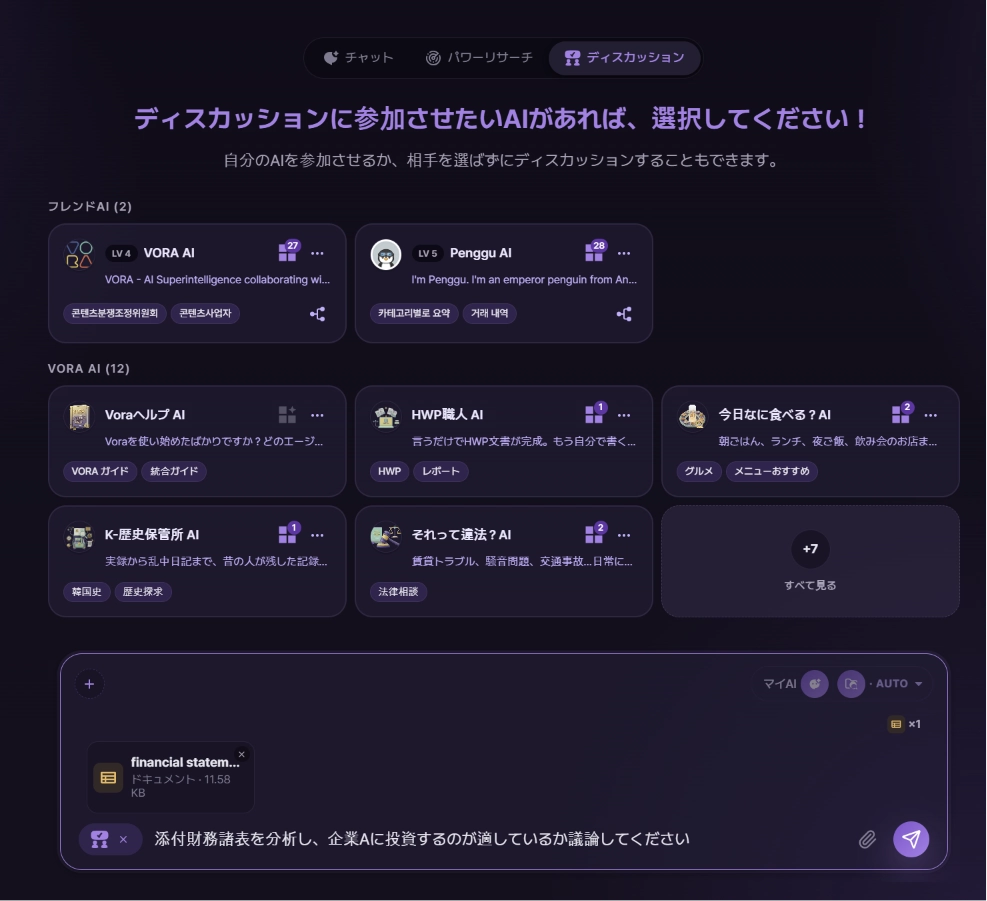
テキストのテーマだけが対象ではありません。入力欄の添付ボタンから資料や文書を一緒にアップロードすると、そのファイルをもとに討論を進められます。たとえばレポートを添付して「この資料について賛否で討論して」のように依頼できます。
ここまでがディスカッションの基本的な流れです。一人では一方に偏りがちなテーマも、複数のAIが異なる立場でぶつかり合って整理してくれるので、考えの幅を広げたいときに使ってみてください。